


Creating WordPress theme
Without its own menus and sub-menus, a WordPress site will not last long. It is also easy to customize these menus to your liking in WordPress. Therefore, your WordPress menu is a "first line" tool for getting high search rankings and keeping visitors on the site.
A separate screen in WordPress shows how complex your menu is. You can also display menus in multiple locations on the website. If you have coding skills, you can customize your WordPress menu almost unlimitedly.
In this article, we will provide you with an in-depth guide to creating a WordPress menu. We will also show you how to take over the feature and add it in a few different ways.
contents
1. Anatomy of the WordPress Preamble
2. Different types of WordPress menu structure
3. How to create a custom WordPress theme (3 ways)
4. How to add your own WordPress theme
Anatomy of the WordPress Preface
For strangers, a WordPress theme is usually a set of links (including downloads). It is a direct function, with only one "vertebrae" behind your website.
Example of WordPress menu.
We will detail where you can find the menu in the next section of the website. Now, know that they can place them where you want them to appear. You may only have a few pre-selected options (based on the widget area). However, technically, the menu can be placed anywhere.
Of course, the WordPress menu is essential for browsing the website. If you have a clear navigation menu, it will help users navigate your website and will reduce your bounce rate.
They have another purpose: to help your search engine optimize your search engine optimization (SEO). Optimizing your WordPress menu for SEO is more about what you don’t include. First, you can delete elements (such as tag clouds) and reduce the number of links included.
When Google allows you to add more than 250 links per page, you need to increase your "link value." In this way, reducing the number of external links will serve you in the long run.
Without its own menus and sub-menus, a WordPress site will not last long.
Different types of WordPress menu structure
As you already know, you can choose different WordPress menu structures according to the needs of your application.
For example, title menus are not the most common because they handle basic site navigation. You will usually also find a smaller menu above the main navigation as this is a good place to put social media icons, search bar, etc.
The Atakdomain SAU / CAL partner website has a "fly-in" menu, which includes navigation and social links:
A flight view showing two menus.
This preview shows that there are more instances of using WordPress menus than web browsers. Using the built-in WordPress functions (more on that later), you can create menus for almost anything you need.
Footers are as popular as headline navigation. You will often use this area to redirect your users to the following navigation. At the same time, it is also a good place to get more product and service links:
Atakdomain Footer menu.
If the website uses it, you will also find the menu in the box:
Example of side-by-side navigation.
Although in most cases you will not find basic navigation here, it is the traditional location for social links, blog post archives, etc.
How to create a custom WordPress theme (3 ways)
Regardless of your level of expertise, creating a WordPress template is a tedious process. There are three main ways to complete the work: use the built-in WordPress function; install a reasonable plug-in or let your hands dirty the code.
Next, we will show you how to create a WordPress menu using all three methods.
1. Create your own menu using WordPress built-in utilities
WordPress has built-in tools that can help you create menus. All users are familiar with a single screen in WordPress administration, but new users are not.

WordPress menu view.
Of course, there are many benefits to using custom functions to create your own WordPress menus. First of all, you have a perfect treatment of your website. In addition, you can create your own menus using familiar tools and custom tools.
To get there, go to the appearance page> add in WordPress:
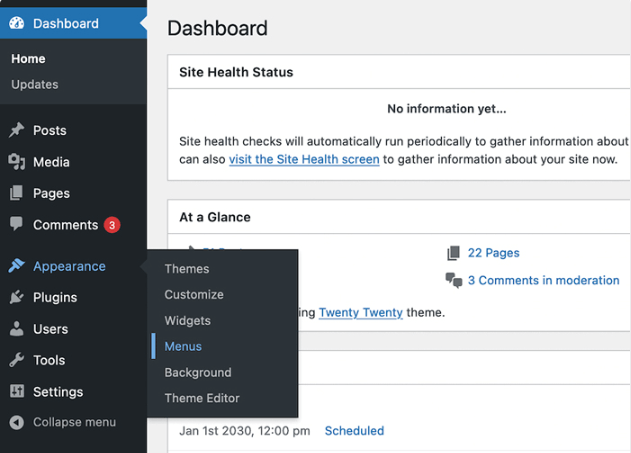
WordPress theme chain.
This screen is divided into several different sections. Above, you will find options to choose an existing menu or create a new menu:

Select the download menu.
If you decide to create a new menu, give it a name and check the "Menu Settings" section:
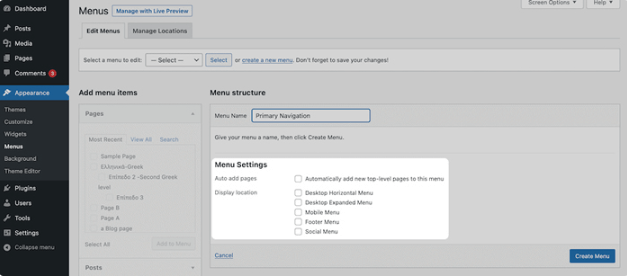
"Menu Settings" section.
There are many checkboxes here, but you need to make two main decisions:
• The top page is automatically added to the menu. The "top level" here means that the page you will create in WordPress is not a subpage of other pages. For example, a blog post is not a top-level page because in most cases it will have a parent archive page (example/blog). On the other hand, the contact page is usually at the top level because it usually does not have a parent page.
• Menu location. Each theme has its own menu location. The theme developers strictly coded these menu locations until you change the basic file of the theme. Maybe some themes allow you to customize them with their settings.
When you are ready, click the "Create Menu" button. The screen will refresh and show you in the new menu. Next, look at the left side of the screen: Menu item accordion menu.
This screen lists all the posts, pages, taxonomies, and other link attributes on your website. You can create a menu by checking the box on the left, and then click the "Add to Menu" button.
It will bring them to the center of the preview screen:

Drag and drop to preview the structure part.
Here, you can drag and drop menu items. If you purchase an expansion arrow next to each item, you can also set or remove a label for your menu:

Expand the menu item.
After clicking "Save Menu", you can start. However, if you expand the "Screen Options" menu at the top of the screen, you can use the WordPress menu to do the following:
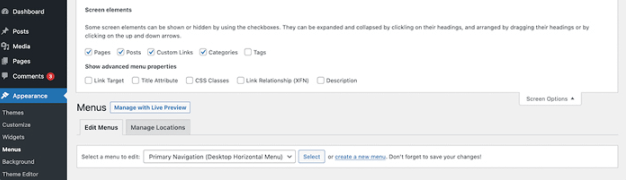
Screen options panel.
The screen element group allows you to display the dish cell box on the left. On the contrary, the display advanced menu attribute group displays the object, definition, and CSS class of the item element.
The other side of the menu screen deserves attention. The "Automatic link" box allows you to set up a link of your choice instead of a pre-arranged page on the website:
Automatically link meta boxes.
This option is how you add social media links to your WordPress menu. The platform will draw the correct icon for you according to the site you choose, and provide the site with the opportunity to display a good logo.
2. Use plugins to create custom WordPress themes
The immediate solution for adding functionality in WordPress is plugins. The previous section explained why the local WordPress option is almost what you need, but the plugin can extend that functionality.
There is a problem, you need a specific plugin (and plugin) to create a WordPress menu, although there are many good reasons for this. First, you usually create menus based on styles that are not accessible under custom settings. You can get special responsive design, "super menu", etc. through plug-ins.
Alternatively, you can use a defined editor to create a menu, and in most cases choose from pre-made templates. With a wide range of customization options, you will have a "no code" solution that will provide a WordPress menu suitable for your website.
For example, the Max Mega Menu application will not provide you with any surprises:
Added Max Mega menu.
After installation and activation, you will find a new Mega Menu panel in WordPress:
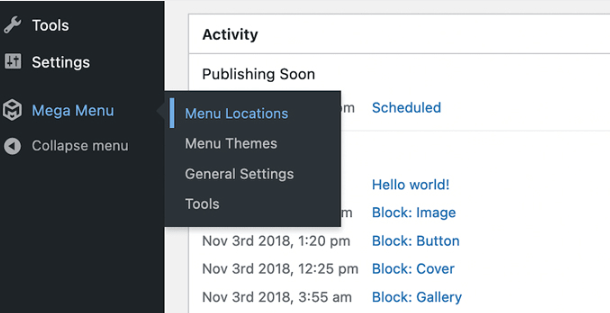
The location of the link menu in WordPress.
If you look at the "Menu Location" screen, you will notice that you have more features:
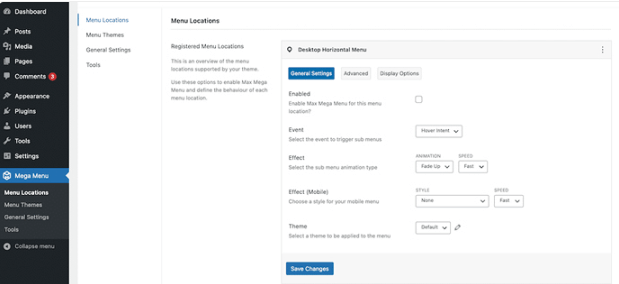
The display position screen of the Max Mega menu.
You can also customize the menu items in some of the best page builders on the market and modify them using the same framework:

The theme screen in the Max Mega menu.
We can explore many other things here, although we will repeat it. We encourage you to check out my previous post about WordPress menu plugins. We explained in detail how to choose the right supplement for you and how to use it.
How tı increase the traffic?
Join others who have received my weekly newsletter
3. Write code to create a custom WordPress theme
Coding WordPress menus is a reliable way to achieve your goals in a period of time (or if you are a developer creating a new WordPress theme). Of course, you don't have to open the code editor every day to add menus. For this, you will use native WordPress tools (or possibly plugins).
In other words, if you want to develop a theme, learning how to write a WordPress theme is an indispensable tool. There are four parts to success:
• Register your menu.
• Display the WordPress menu on the front.
• Add extra content to your menu or item.
• Specify a callback.
We will assume that you are very useful with a code editor, you have a development environment in which you can work, and your skills are sharp. If you don’t have a theme to use, you can use the custom WordPress option or choose one of my quick WordPress themes.
When you are ready, you will open the theme file of functions.php. Note that this is different from the regular WordPress file of the same name. Here, you need to save the menu. In other words, you need to tell WordPress what to appear on the Appearance page> Preview. To do this, use the register_nav_menus () function:
register_my_menus () (function
register_nav_menus (
Row (
'header' => __ ('Hader Menu'),
'Other' => __ ('Other menu')
)
);
}
add_action ('init','register_my_menus');
This code pops up from the Location Manager tab in WordPress to display two menus: the title menu and other menus:
Save the menu in WordPress.
Next, you must use the wp_nav_menu () function to display your menu. You will add it to the template file related to where you want to display the menu. In our example, we will use the title, so we add the following code to the title.php file of our theme:
wp_nav_menu( array( 'theme_location' => 'header' ) );
This code may already be included in if-so statements in your other menus, so you may need to follow the agreement you see.
At this point, you can use the WordPress menu just like any other menu. However, you may also want to add more content to the menu items. For example, you can expand the specified order to include HTML tags that will be printed on the output:
wp_nav_menu(
array(
'menu' => 'primary',
'link_before' => '',
'link_after' => '',
)
);
Your next task here is to specify the return. Specifically, when the specified menu is not visible, WordPress will introduce a complete menu. Or, when the custom menu is not selected, WordPress will display a list of pages. If this is not what you want, you can set a different scale for the topic-space parameter and add it to the fallback_cb parameter:
wp_nav_menu(
array(
'menu' => 'primary',
// do not fall back to first non-empty menu
'theme_location' => '__no_such_location',
// do not fall back to wp_page_menu()
'fallback_cb' => false
)
);
Once you understand how to create a WordPress menu, you can start adding features. We will see this in the next section, creating a custom meta box for WordPress.
Your WordPress menu is a "first line" tool that can be used to gain high search rankings and keep visitors on the site.
How to develop your menu How to develop your WordPress menu
Since this section is advanced, we will make some assumptions before proceeding:
Need to provide fast, reliable and completely secure hosting services for your e-commerce website? Atakdomain provides all of these and 24/7 global support from WooCommerce experts. View our plan
• You know how to use PHP to create WordPress menus.
• Your PHP difficulty is enough to allow you to understand some advanced topics.
• You know how to register and deploy WordPress plugins.
This is beyond the scope of this article, but you can use the WordPress Boilerplate Generator Plugin to create a new, standardized plugin template.
Development of WordPress boilerplate generator.
When you are ready, create and upload your own WordPress plugin:
New plugin installed in WordPress.
Next, browse to the attachment folder and open the main file. Here, add the following code:
/**
* Add menu meta box
*
* @param object $object The meta box object
* @link https://developer.wordpress.org/reference/functions/add_meta_box/
*/
function custom_add_menu_meta_box( $object ) {
add_meta_box( 'custom-menu-metabox', __( 'Authors' ), 'custom_menu_meta_box', 'nav-menus', 'side', 'default' );
return $object;
}
add_filter( 'nav_menu_meta_box_object', 'custom_add_menu_meta_box', 10, 1);
The WordPress add_meta_box () function will save a meta box in the WordPress management. There are some parameters you want to refer to in the official documentation. We also used the nav_menu_meta_box_object() filter because there are no activities to link to in the nav-menus.php file. This statement determines whether the function adds the menu item to the meta type. add_meta_box saves a custom meta box while the filter is running.
Define callback function
Next, we can define a return function to generate HTML content for the meta box:
/**
* Displays a metabox for an author menu item.
*
* @global int|string $nav_menu_selected_id (id, name or slug) of the currently-selected menu
*/
function custom_menu_meta_box(){
global $nav_menu_selected_id;
$walker = new Walker_Nav_Menu_Checklist();
...
}
The global variable remembers the current menu ID, while $walker stores a A new instance of the Walker_Nav_Menu_Checklist object. It will create the HTML title of the menu item.
From here, we need to specify the activity table in the custom meta box. For this, we set the value of $current_tab, which works inside the ellipse installed in the code block earlier.
We use two tables here, but you can add as many tables as you want:
$current_tab = 'all';
if ( isset( $_REQUEST['authorarchive-tab'] ) && 'admins' == $_REQUEST['authorarchive-tab'] ) {
$current_tab = 'admins';
} elseif ( isset( $_REQUEST['authorarchive-tab'] ) && 'all' == $_REQUEST['authorarchive-tab'] ) {
$current_tab = 'all';
}
The following line will grant all users permission to write and add many functions to the authors object:
$authors = get_users( array( 'orderby' => 'nicename', 'order' => 'ASC', 'who' => 'authors' ) );
$admins = array();
/* set values to required item properties */
foreach ( $authors as &$author ) {
$author->classes = array();
$author->type = 'custom';
$author->object_id = $author->nickname;
$author->title = $author->nickname . ' - ' . implode(', ', $author->roles);
$author->object = 'custom';
$author->url = get_author_posts_url( $author->ID );
$author->attr_title = $author->displayname;
if( $author->has_cap( 'edit_users' ) ){
$admins[] = $author;
}
}
$removed_args = array( 'action', 'customlink-tab', 'edit-menu-item', 'menu-item', 'page-tab', '_wpnonce' );
?>
Here, get_users returns a set of user items selected according to the specified conditions. The parameter who will force WordPress to ask users who do not have authoring permissions in the database.
In addition, the admins row will store a set of authors, and $removed_args will store the list of query variables to be removed.
Now you can print the meta box icon. To do this, let's create tags and table links.
<div id="authorarchive" class="categorydiv">
<ul id="authorarchive-tabs" class="authorarchive-tabs add-menu-item-tabs">
<li <?php echo ( 'all' == $current_tab ? ' class="tabs"' : '' ); ?>>
<a class="nav-tab-link" data-type="tabs-panel-authorarchive-all" href="<?php if ( $nav_menu_selected_id ) echo esc_url( add_query_arg( 'authorarchive-tab', 'all', remove_query_arg( $removed_args ) ) ); ?>#tabs-panel-authorarchive-all">
<?php _e( 'View All' ); ?>
</a>
</li>
<li <?php echo ( 'admins' == $current_tab ? ' class="tabs"' : '' ); ?>>
<a class="nav-tab-link" data-type="tabs-panel-authorarchive-admins" href="<?php if ( $nav_menu_selected_id ) echo esc_url( add_query_arg( 'authorarchive-tab', 'admins', remove_query_arg( $removed_args ) ) ); ?>#tabs-panel-authorarchive-admins">
<?php _e( 'Admins' ); ?>
</a>
</li>
</ul>
Remember to separate the real class name, identity, and data attributes from the meta box element; otherwise, the menu will not work as expected.
The add_query_arg and remove_query_arg functions both set table-specific values for the authorarchive-tabs variable and remove unnecessary variables.
At this point, there is a meta box with a definition table:
An unpublished table in the Authors meta box.
Our next step is to create the HTML content of the table.
Create HTML content for meta box tabs
You want to follow the code in the previous section in the custom_menu_meta_box () function. To create content, use the <div> tag you wrote in the last section below:
<div id="tabs-panel-authorarchive-all" class="tabs-panel tabs-panel-view-all <?php echo ( 'all' == $current_tab ? 'tabs-panel-active' : 'tabs-panel-inactive' ); ?>">
<ul id="authorarchive-checklist-all" class="categorychecklist form-no-clear">
<?php
echo walk_nav_menu_tree( array_map('wp_setup_nav_menu_item', $authors), 0, (object) array( 'walker' => $walker) );
?>
</ul>
</div>
<div id="tabs-panel-authorarchive-admins" class="tabs-panel tabs-panel-view-admins <?php echo ( 'admins' == $current_tab ? 'tabs-panel-active' : 'tabs-panel-inactive' ); ?>">
<ul id="authorarchive-checklist-admins" class="categorychecklist form-no-clear">
<?php
echo walk_nav_menu_tree( array_map('wp_setup_nav_menu_item', $admins), 0, (object) array( 'walker' => $walker) );
?>
</ul>
</div>
In short, each tab contains the address of the check box. The walk_nav_menu_tree () function prints a list with three parameters: $items, $depth, and $r-all are required.
The $items line contains a group of administrator users. The array_map() function adds the wp_setup_nav_menu_item() function to $admins and adds the menu attribute to the row element.
The author's meta box resides in the user.
From here, we can add the final file.
Add submit button
Most of the custom meta boxes are complete, but we still need to add a submit button and a "spinner" icon to the process.
Here is a small piece of code, you can put it directly after the previous block:
<p class="button-controls wp-clearfix">
<span class="list-controls">
<a href="<?php echo esc_url( add_query_arg( array( 'authorarchive-tab' => 'all', 'selectall' => 1, ), remove_query_arg( $removed_args ) )); ?>#authorarchive" class="select-all"><?php _e('Select All'); ?></a>
</span>
<span class="add-to-menu">
<input type="submit"<?php wp_nav_menu_disabled_check( $nav_menu_selected_id ); ?> class="button-secondary submit-add-to-menu right" value="<?php esc_attr_e('Add to Menu'); ?>" name="add-authorarchive-menu-item" id="submit-authorarchive" />
<span class="spinner"></span>
</span>
</p>
</div>
<?php
}
Complete the author frame element in WordPress.
Armed with this knowledge, you can add almost any function to your menu! Please note that there is also a universal extension for the application on GitHub, which is available for free download.
compilation
The WordPress menu is an important aspect of your website. Therefore, the platform provides a native and powerful panel that allows you to customize every menu on the site. However, it will provide everything you need.
Many screen options can help you add CSS tags and more. At the same time, installing additional components will allow you to customize the custom menu into a large menu and use advanced features to make your functions more responsive (among other things). Coding is also a possibility, and although it is a difficult task for modern coders, you can put it together.
Do you want to customize your WordPress menu? If so, what method do you plan to use? Share your thoughts and thoughts in the comments section below!
_______________________________________
Save time, money, and improve website performance by:
• Instant help from WordPress hosting experts, 24/7.
• Cloudflare Enterprise integration.
• Reach global audiences through data centers around the world.
• Use our built-in application performance monitor for optimization.
Check our plans and contct the seller to find a plan that suits you.
Random Articles

A Complete Guide on xmlrpc.php in WordPress (What It Is, Security Risks, How to Disable It)
13.01.2022
How to A/B Test with Google Optimize in WordPress for Free
02.03.2022
What is a Domain Name Extension?
26.04.2021
Types of Domain Names: A Helpful Guide
22.04.2021
Rebranding with a New Domain? Here's How to Retain SEO & Brand Equity
04.11.2025