
The Ultimate Guide to Using WordPress Permalinks
A permalink is the link that is used to access a specific piece of content on your site.
For example, the homepage at Atakdomain is at https://atakdomain.com/, our blog is at https://atakdomain.com/blog/ and a single post uses a link like https://atakdomain.com/blog/wordpress-widgets/.
Permalinks are also used for archive pages, static pages, and any content on your site that needs its own URL.
In this post, we’ll show you how permalinks work, how to optimize them for your site, and how to configure them via your settings screen and by writing some code.
- What are WordPress Permalinks?
- How WordPress Permalinks are Created
- Permalinks, Slugs, and SEO
- Permalinks, Slugs, and UX
- How to Change Permalink Settings in WordPress
- How to Change Permalinks in WooCommerce
- How to Change WordPress Permalinks With a Plugin
- How to Change WordPress Permalinks in phpMyAdmin
- Working with Image Permalinks
- How to Redirect Permalinks for Different Content Types
- Troubleshooting WordPress Permalinks
What are WordPress Permalinks?
As defined on the official WordPress codex:
“WordPress Permalinks are the permanent URLs to your individual weblog posts, as well as categories and other lists of weblog postings.”
Each page in your site (including posts, pages, archive pages, and other pages such as the 404 page) will have its own permalink.
So, for example, your home page will be at yoursite.com, while your blog is at yoursite.com/blog.
If you have a ‘featured’ category in your blog, that could be at one of a number of URLs:
- yoursite.com/category/featured
- yoursite.com/blog/featured or just
- yoursite.com/featured.
Individual posts also have their own permalink. In your theme template files, the template tag the_permalink() will be used to fetch the URL of a post and create a clickable link from it.
WordPress uses this to fetch the unique permalink for the individual post and output it within an <a> element so it can be used as a link in your blog post listings.
The beauty of having this template tag is that you only need to use that one piece of code to fetch the link to any post on your site, and you don’t have to hard code any links into your theme.
The Difference Between Permalinks, Slugs, and Links
In this post, we’ll be focusing on permalinks in detail, but we’ll also be looking at slugs. So what’s the difference between them?
The permalink is the entire link to a post. So, the link I gave earlier to a Atakdomain post on widgets is https://atakdomain.com/blog/wordpress-widgets/.
The slug is the final part of that permalink, and it’s unique to that post. In this case, it’s wordpress-widgets.
That slug is automatically generated for you based on the title of a post. And if you want to create a slug manually for a post, you can. I’ll show you how (and why you might want to) later in this post.
How WordPress Permalinks are Created
In a static website, a URL identifies a resource by its name and directory path, as shown in the following example:
https://example.com/path/to/resource/wordpress-permalinks.html
In order to have well-structured URLs we just need a well-structured file system and properly named resources.
But the web is dynamic, and we are used to managing websites using database-driven CMSs, meaning URLs will contain a number of parameters whose values determine the query to be run against the database.
Consider the following example:
https://example.com/?key1=val1&key2=val2
In this URL you’ll notice a separator (the question mark), and a set of key/value pairs (separated by ampersand) which constitute the query string. The URL does not meet usability and accessibility requirements and should be converted into a more meaningful and SEO-friendly permalink.
The way these “ugly” URLs are converted into optimized permalinks depends on your web server. If you are an Apache user, you’ll be required to add a set of rewrite directives into the root folder’s .htaccess file. If you are an Nginx user, you’d add a try_files directive into the main configuration file.
But don’t worry! Most of the time you won’t be required to configure the webserver line by line because WordPress will do that for you.
As an admin user, you can set custom rewrite rules quickly and easily from the admin panel. Advanced users and developers can get even more thanks to the WordPress Rewrite API, which provides functions and hooks that bring permalink customization to a higher level.
An Overview of WordPress Queries
With the specific purpose of building the query, execute it and store results from the WordPress database, WordPress provides the WP_Query class. Thanks to this class we don’t need to care about the query because WP_Querywill automatically handle the request, build the query, and execute it. Then, according to the template hierarchy, WordPress will return the requested resource.
Out of the box, WordPress admits requests for single posts, pages, post types as well as for a number of archives ordered by category, tag, date, author, and more.
Moreover, if default functionalities wouldn’t be enough, developers can build custom queries by creating new instances of the WP_Query class (the query object) or passing specific parameters to an existing instance of the query before its execution.
The query parameters are named strong>query variables and are divided into three groups.
Public Query Vars
These variables are public in the sense that they are available to be used in public requests (i.e. the URLs). Thanks to these variables, we can ask for posts by authors:
?author=12?
author_name=mickey
By category or tag:
?cat=4,5,6
?category_name=CMS
?tag=wordpress
By date and time:
?monthnum=201601
?year=2015?w=13
?day=31
By post or page:
?p=123
?name=hello-world
?page_id=234
And much more.
Private Query Variables
These variables are not meant to be added to URL query strings. They can be used to affect queries just within a script (a plugin or a theme’s functions.php file).
The following query string would not return the expected result:
?meta_key=city&meta_value=London
strong>meta_key and strong>meta_value are private query variables not to be defined in query strings. They should be passed to an instance of the query object, as I will show you later.
See the full list of public and private query variables in the Codex.
Custom Query Variables
These user-defined variables can be passed via URL query strings much like public query vars. The main difference between public and custom variables is that WordPress won’t handle custom vars on its own, and we should get their values from a plugin to customize queries.
That being said, let’s get back to permalinks.
Ugly WordPress Permalinks and Query Vars
Ugly Permalinks show up the query string, i.e. the part of the URL containing a set of query variables (the query string) that will determine the returned resource.

Plain setting in Permalinks settings screen
As an example, consider the following URLs:
https://example.com/?cat=5
https://example.com/?cat=5,7,9
In response to these URLs, WordPress would return the archive of posts belonging to the specified categories.
We are not limited to just one parameter per URL. In the following examples we’re building more complex queries:
?author_name=lucy&category_name=WebDev?tag=wordpress&m=201606
In the first query string, author_name and category_name will require all posts by the specified author in the WebDev category. In the second query string, tag and m will require all posts tagged as “wordpress” and published in June 2016.
As you can see, we can set more than one query variable and force WordPress to run advanced queries just adding the appropriate key=value pairs to query strings.
Pretty Permalinks: A Better Alternative
By enabling Pretty Permalinks we set a usable, accessible, and SEO-friendly URL structure. Let’s compare the following URLs:
https://example.com/?p=123
https://example.com/wordpress-permalinks/
In this example, the ugly permalink shows the p variable and its value (the post ID), while the pretty URL shows the post slug.
WordPress provides four Pretty Permalink formats we can choose from in Permalink Settings Screen, as shown in the image below.
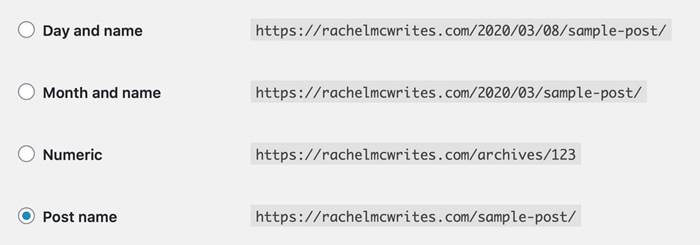
Pretty permalinks in Permalinks settings
But you aren’t limited to default formats, as WordPress lets you customize the pretty permalink format by setting one or more structure tags.

Custom structure option
I’ll show you these in detail later in this post.
Why Are Pretty Permalinks Important?
Using pretty permalinks for your WordPress site will have two benefits: SEO and User Experience.
Why’s that? >Search engines use your URL as an indication of what the post is about. If the content of the permalink relates to the content of your post, that will help search engines determine what your post is about and that it’s legitimately about what it claims to be about.
For UX, pretty permalinks are better because they make it easier for users to remember and use URLs on your site. No one is going to remember the URL of your contact page if it’s strong>yoursite.com/?p=456. But they are going to remember strong>yoursite.com/contact.
Permalinks, Slugs, and SEO
The post slug is the very last part of the URL for a post. If you’ve configured WordPress Permalinks settings so that the post name is used, the slug for a post called ‘how to create pretty permalinks’ will be automatically generated as strong>yoursite.com/how-to-create-pretty-permalinks/.
That’s a decent slug. It tells users what the post is about and for search engines it contains ‘pretty permalinks,’ which may be the keyword you’re targeting.
But it can be improved upon.
Your slugs should be long enough to include the keywords you’re targeting but short enough to be memorable for users and not to confuse search engines with lots of unnecessary words (here’s how to create SEO-friendly permalinks in WordPress).
So a post called “how to create pretty permalinks” might be better off with a slug of strong>pretty-permalinks, giving you strong>yoursite.com/pretty-permalinks/. Or if you have multiple posts on pretty permalinks and want to give this one a specific slug relating to the fact it’s a how-to guide, you could usestrong> create-pretty-permalinks, giving you strong>yoursite.com/create-pretty-permalinks.
Or to take things further you could improve SEO even further by including ‘WordPress’: strong>example.com/create-wordpress-pretty-permalinks.
When people are looking at your link in a search result, you also don’t want the search result to be so long that it can’t all be read. Below are two results I get from the Atakdomain blog when I google ‘wordpress permalinks’.
Google result – WordPress permalinks
Both of these have well-optimized slugs. The first is wordpress-premalinks-url-rewriting, indicating that it’s targeting those keywords, and the second is wordpress-slug, which is even more focused.
These slugs don’t waste any words. They tell search engines what the post is about and nothing else.
You can optimize your slugs for SEO first by selecting strong>Post name in the Permalinks settings screen and then by when you write it.
Permalinks, Slugs, and UX
Using pretty permalinks and using short, memorable slugs will also give you UX benefits.
According to a 1999 post by Jacob Nielsen, a usable website requires:
- a domain name that is easy to remember and easy to spell.
- short URLs.
- easy-to-type URLs.
- >URLs that visualize the site structure.
- URLs that are “hackable” to allow users to move to higher levels of information architecture by hacking off the end of the URL.
- persistent URLs that don’t change.
A URL should never change, as it can be stored and shared in many ways. That’s the reason why we call them permalinks. Furthermore, a URL should be semantic, in the sense of being immediately and intuitively meaningful to non-expert users.
So while it is possible to change the permalink of a post after you’ve published it, it isn’t a good idea. That’s because the original permalink may already have been shared. If you need to change it, make sure to follow the WordPress redirect best practices.
How to Change Permalink Settings in WordPress
In WordPress, you can change the permalinks in a number of ways:
- You can edit the Permalinks settings screen to turn on pretty permalinks – something you should do as soon as you set up your website.
- You can edit the permalink structure for tags and categories in the Permalinks screen.
- You can edit slugs for individual posts when you are creating and editing them.
- You can specify the structure of links to custom post types when you register them, choosing to use the default or to overrule it.
- You can write a plugin to amend the way permalinks are structured.
- You can use redirects to get an out of date permalink pointing to a new one.
Let’s take a look at each of these.
Editing Overall Permalink Settings
The Permalinks settings screen is the first place to go to configure your permalinks. Access it via strong>Settings > Permalinks.
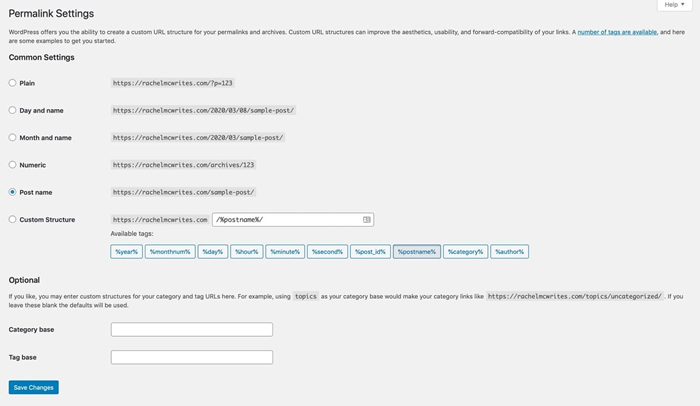
Permalink settings screen
Common Settings
The first section deals with settings for single posts. The options are:
- Plain: this uses the Post ID for the link. It’ll make sense to browsers but won’t mean much to human beings or search engines. It looks like this: strong>example.com/?p=123.
- Day and name: This includes the full date the post was published on as well as its name (or more accurately its slug). It looks like this: strong>example.com/2020/06/01/my-post/.
- Month and name: This is a shorter version of day and name, with just the month and year and not the day: strong>example.com/2020/06/my-post/.
- Numeric: Like the plain option, this uses the post ID and isn’t very user-friendly. strong>example.com/archives/123.
- Post name: This option doesn’t include any dates or post IDs but just uses the slug: strong>example.com/my-post/.
- Custom structure: Here you can create your own custom structure. Use tags to fetch information based on the post data, and static text to add something which won’t change between posts.
These tags are specific keywords wrapped within the % character. WordPress provides the following tags:
- strong>%year% – the year of post-publication (four digits).
- strong>%monthnum% – the month of publication (two digits).
- strong>%day% – the day of publication (two digits).
- strong>%hour% – the hour of publication (two digits).
- strong>%minute% – the minute of publication (two digits).
- strong>%second% – the second of publication (two digits).
- strong>%post_id% – the post unique ID (integer).
- strong>%postname% – the post slug (i.e. the sanitized string representing the title of the post).
- strong>%category% – the category slug.
- strong>%author% – the author slug.
Try checking the strong>Custom structure radio button and adding one of the following strings into the text field:
- strong>/%author%/%postname%/
- strong>/%year%/%postname%/
- strong>/%category%/%postname%/
Any of these strings generates a different pretty permalink with specific semantic values, as shown below:
example.com/rachelmccollin/wordpress-permalinks/
example.com/2020/wordpress-permalinks/
example.com/CMS/wordpress-permalinks/
In the first example, the resulting URL highlights the author of the post. The other two formats tell us the year of publication and the post category respectively. It’s up to you to choose the format that suits you best.
Once you’ve selected the option you want, either move on to the Optional section or click strong>Save changes to save your settings.
Optional Permalink Settings
As well as the settings for your single posts, the Permalinks settings screen also lets you set a custom structure for your category and tag archives.
If you don’t do this, the default is to include strong>/category/category-slug/ at the end of the permalink. So if you have a category of ‘featured’, its archive page would be at strong>yoursite.com/category/featured.
Optional permalink settings
You can amend this in the Optional section of the Permalinks settings page. So if you wanted to have strong>yoursite.com/blog/featured/ as the permalink for that category archive, you would enter strong>blog in the strong>Category base field. You don’t have to insert backslashes or use tags.
How to Change Permalinks and Slugs for Individual Posts and Pages
Once you’ve activated pretty permalinks on your WordPress site, it’s time to optimize the slug for individual posts and pages.
It’s best to do this when you’re creating your content. If you change a post’s slug, then you will change the URL it uses, and any links you or your visitors shared in the past will no longer work.
To edit a post’s slug, you work in the post editing screen for that post. Go to strong>Posts and select the post you want to edit. (If you’re in the process of creating the post, you’ll already be on the right screen.)
In the post editing screen, select the strong>Document pane on the right-hand side and go to the strong>Permalink section. Click on the arrow to the right of it if it’s not already open.
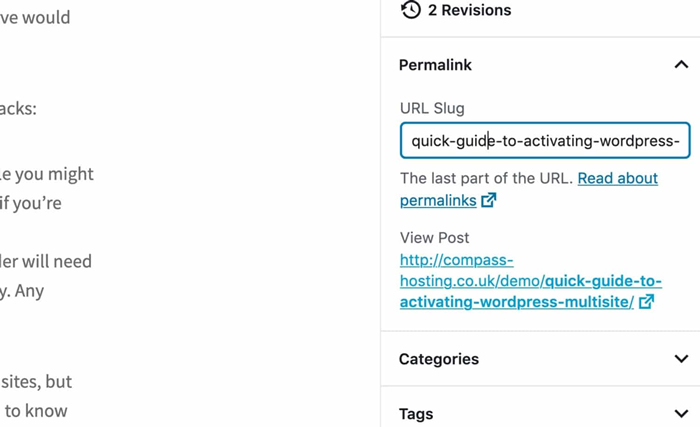
Permalink editing in post editing screen
The automatically generated slug will be displayed in the strong>URL Slug field. You can edit this to make the slug shorter and more focused.
Before you edit it, copy the old slug somewhere so you can use it if you need to >set up a redirect afterward (this only applies to previously published posts).
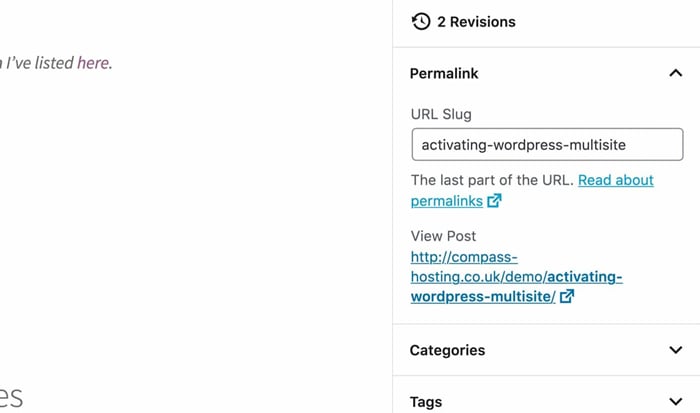
Slug edited
Now click the strong>Publish or strong>Update button to save your changes.
Don’t forget: if you’ve edited the slug for an existing post, you could create a problem for people who have the original link and should use redirects.
How to Change Permalink Settings for Archive Pages
To change permalink settings for individual archive pages, you can edit the settings for the ‘category’ or ‘tag’ base in the Permalinks settings screen. You can also change the slug for an individual category, tag, or custom taxonomy.
Let’s look at how you do that, then move on to editing the permalink for custom taxonomies and post types when you register them.
Changing Slugs for Categories and Tags
To do this, go to strong>Posts > Categories (or strong>Posts> Tags).
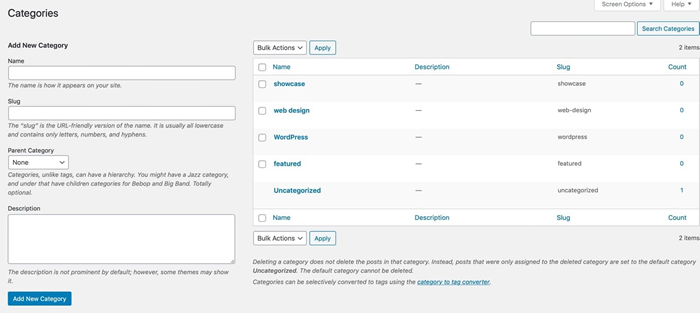
Categories editing screen
Find the category or tag whose slug you want to edit and click on its name.
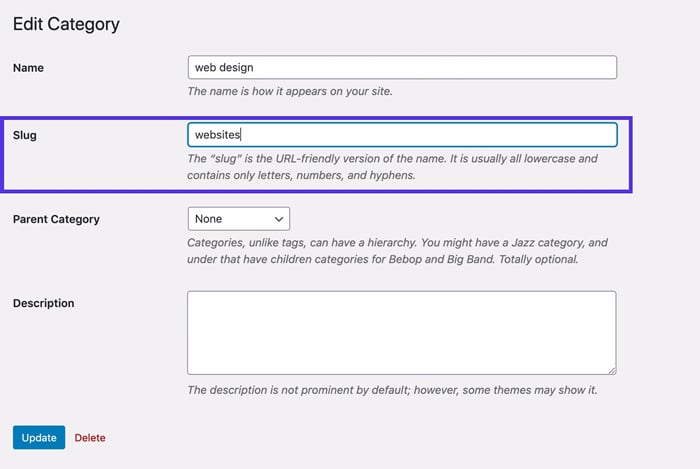
Editing a category slug
You can then type in a slug for the category or tag. WordPress will automatically generate one based on the name of the category or tag, but you don’t have to keep this. As with posts, it’s sensible to do this when you set up the category or tag. If you do it later, you’ll need to set up a redirect.
If you set up a custom taxonomy, or one is created by a plugin, you can edit the slugs for individual terms in that taxonomy in exactly the same way. But if you want to edit the slug for the taxonomy itself, you’ll need to edit some code.
Changing Slugs for Custom Taxonomies
When you register a custom taxonomy, the archive pages for that taxonomy will automatically have a URL of strong>yoursite.com/taxonomy/term, where strong>taxonomy is the taxonomy ID and strong>term is the term slug.
Let’s imagine you register a custom taxonomy for languages with the ID of strong>atakdomain_language, which uses a prefix to ensure it’s distinct from any other taxonomies registered by other plugins. You might then create a term with a slug of strong>french.
The URL for the archive of that taxonomy term would be strong>yoursite.com/atakdomain_language/french.
But what if you want to change that so it doesn’t include that prefix and is more user-friendly? You can do this using the rewrite argument when you register the taxonomy.
Here’s the code you would use to register the taxonomy, including the rewrite argument.
function atakdomain_register_taxonomy() {
// languages
$labels = array(
'name'=> __( 'Languages' ),
'singular_name' => __( 'Language' ),
'search_items' => __( 'Search Languages' ),
'all_items' => __( 'All Languages' ),
'edit_item' => __( 'Edit Languages' ),
'update_item' => <span style="font-family: Consolas, serif;">__( 'Update Languages' ),
'add_new_item' => __( 'Add New Language' ),
'new_item_name' => __( 'New Language Name' ),
'menu_name' => __( 'Languages' ),
);
$args = array(
'labels' => $labels,
'hierarchical' <span style="color: #9a6e3a;">=> true,
'sort' => true,
'args' => array( 'orderby' => 'term_order' ),
'rewrite' => array( 'slug' => 'language' ),
'show_admin_column' => true,
'show_in_rest' => true
);
register_taxonomy( ‘atakdomain_language', array( 'post', ‘attachment' ), $args);
}
add_action( 'init', 'atakdomain_register_taxonomy' );
The important line in that code is this one:
'rewrite' => array( 'slug' => 'language' ),
That rewrites that slug from strong>atakdomain_language (the ID) to strong>language (the new value). So your new URL would be strong>yoursite.com/language/french. Much more user friendly!
How to Change Slugs for Custom Post Types
Custom post types work in the same way as custom taxonomies when you’re registering them, so they’ll have a URL that includes the ID of the custom post type.
Formun Üstü
Formun Altı
Want to know how we increased our traffic over 1000%?
Join 20,000+ others who get our weekly newsletter with insider WordPress tips!
Let’s imagine you register a custom post type called strong>atakdomain_book and you create a post of that post type called ‘Huckleberry Finn’, with a slug of strong>huckleberry-finn.
The URL would be strong>yoursite.com/atakdomain_book/huckleberry-finn. And the slug for the post type archive would be strong>yoursite.com/atakdomain_book.
Again, you can change this when you register the custom post type, using the rewrite argument. Again, here’s the code including that argument:
function atakdomain_register_post_type() {
// books
$labels = array(
'name' => __<span style="color: #999999;">( 'Books' ),
'singular_name' => __( 'Book' ),
'add_new' => __( 'New Book' ),
'add_new_item' => __( 'Add New Book' ),
'edit_item' => __( 'Edit Book' ),
'new_item' => __( 'New Book' ),
'view_item' => __( 'View Book' ),
'search_items' => __( 'Search Books' ),
'not_found' => __( 'No Books Found' ),
'not_found_in_trash' => __( 'No Books found in Trash' ),
);
$args = array(
'labels' => $labels,
'has_archive' => true,
'public' => true,
'hierarchical' => false,
'supports' => array(
'title',
'editor',
'excerpt',
'custom-fields',
'thumbnail',
'page-attributes'
),
'taxonomies' => array( ‘atakdomain_language', 'category'),
'rewrite' => array( 'slug' => 'book' )
);
register_post_type( ‘atakdomain_book', $args );
}
add_action( 'init', 'atakdomain_register_post_type' );
The important line for the slug is this one:
'rewrite' => array( 'slug' => 'book' )
So now the URLs will be strong>yoursite.com/book/huckleberry-finn for an individual book and strong>yoursite.com/book for the archive.
Info
Speaking about books… Did you check Atakdomain’s ebooks section already? They’re free to download and full of actionable tips!
Editing Permalinks Using Custom Fields
In addition to public and private query vars, WordPress allows developers and advanced users to define their own custom query vars. Once registered, these variables can be added to query strings, just like public query vars, and their values can be used to affect queries as well.
Here’s how to build a custom meta query (i.e. a query that retrieves posts by custom field) taking advantage of custom query vars.
In order to accomplish this goal, we will develop a plugin from which we’ll register custom variables, get their values, and change the query accordingly.
Here’s how…
Create a plugin in your wp-content/plugins directory. Add a function to register the query variables:
/**
* Register custom query vars
*
* @param array $vars The array of available query variables
*/
function myplugin_register_query_vars( $vars ) {
$vars[] = 'city';
return $vars;
}
add_filter( 'query_vars', 'myplugin_register_query_vars' );
The query_vars filter lets you add, remove, or change public query vars before the query execution. The callback function in the example stores as argument an array of the available variables adds a new variable and returns the same array.
Next, add this function which uses the value of the variable to change the query:
/**
* Build a custom query
*
* @param $query obj The WP_Query instance (passed by reference)
*
*/
function myplugin_pre_get_posts( $query ) {
// check if the user is requesting an admin page
// or current query is not the main query
if ( is_admin() || ! $query->is_main_query() ){
return;
}
$city = get_query_var( 'city' );
// add meta_query elements
if( !empty( $city ) ){
$query->set( 'meta_key', 'city' );
$query->set( 'meta_value', $city );
$query->set( 'meta_compare', 'LIKE' );
}
}
add_action( 'pre_get_posts', 'myplugin_pre_get_posts', 1 );
The pre_get_posts action hook is triggered after the query is created but before it’s executed. So we can hook a callback function to this action to make our changes to the query before it runs. That’s what happens:
- The callback function keeps an instance of the $query object, which is passed by reference, not by value. This means that any changes to the query object affects the original query and not a copy of it. For this reason, we have to be sure of which query is going to be executed (the main query).
- Later, we get the city value from the current query string thanks to the get_query_var function.
- Finally, if $city is not empty, we can set the meta query elements meta_key, meta_value, and meta_compare. These latter are private query vars not available for public requests. Their values can only be set from within the script.
Now activate the plugin, add the city custom field to a number of posts. Go to Settings > Permalinks to refresh permalinks, you don’t actually have to do anything; just visiting the screen is enough.
Now check URLs like the following:
https://example.com/?city=London
In response to this request WordPress would return all posts where the strong>city field value is strong>London.
Our last task is to convert the ugly URL of the example above in a pretty permalink structure. Let’s add the following function to our plugin:
/**
* Add rewrite tags and rules
*/
function myplugin_rewrite_tag_rule() {
add_rewrite_tag( '%city%', '([^&]+)' );
add_rewrite_rule( '^city/([^/]*)/?', 'index.php?city=$matches[1]','top' );
}
add_action('init', 'myplugin_rewrite_tag_rule', 10, 0);
The add_rewrite_tag and add_rewrite_rule functions are part of the Rewrite API. add_rewrite_tag makes WordPress aware of the city query var, while add_rewrite_rule specifies a new rewrite rule. Both functions should be hooked to the init action. Thanks to new tag and rule, we can use the following URL:
https://example.com/city/London/
WordPress will return an archive of posts where the city custom field value is London.
Note: anytime a new rewrite rule is added, WordPress permalinks have to be refreshed from Permalinks Screen under Settings admin menu.
How to Change Permalinks in WooCommerce
WooCommerce creates custom post types and taxonomies all of its own, all of which have default permalinks defined by the plugin.
You can edit the permalink settings and slugs for all of these.
Changing Product Category, Tag, and Attribute Permalinks
There are two aspects to editing permalinks for product categories, tags, and attributes: the structure and the slug. These work in a similar way to regular categories and tags.
To edit the permalink structure go to strong>Settings > Permalinks and find the strong>Optional section, where WooCommerce will have added some extra fields.
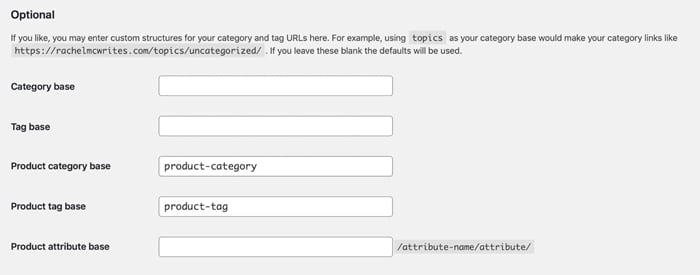
Optional permalinks settings with WooCommerce installed
Here you can edit the permalinks settings for the three custom taxonomies added by WooCommerce:
- Product categories: the default is strong>/product-category/ but you can amend this if you use different terminology in your store. Make sure your change doesn’t clash with your settings for regular categories, which are not the same thing.
- Product tags: the default is strong>/product-tag/, and you can change it if you want to. Make sure you avoid a clash with regular post tags.
- Product attributes: these work differently from the other two taxonomies and have a different structure. Whatever you add here will always be followed by the slug for the individual attribute name (e.g. size) and the attribute itself (the term, e.g. large).
If you want to edit the slug for an individual category or tag, go to strong>Products > Categories (or strong>Products > Tags) and edit these in the same way you would post tags and categories.
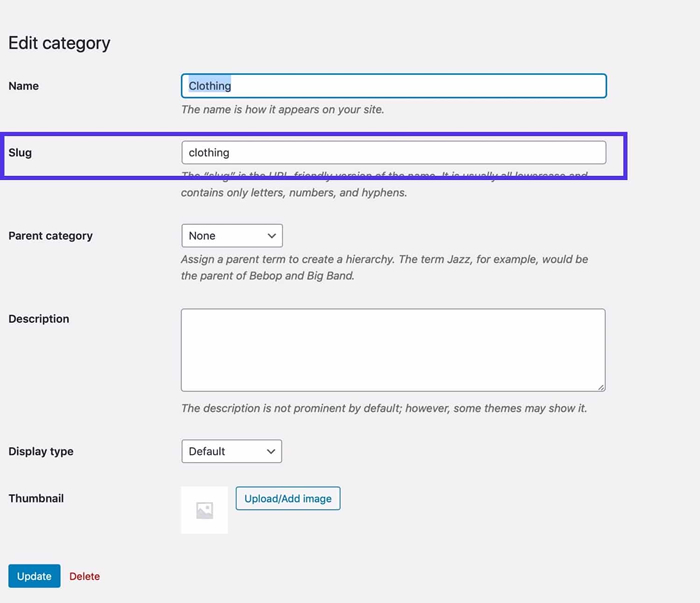
Product category slug editing
Editing attributes is different because not only do you have the attribute itself, but also the attribute terms.
Start by going to strong>Products > Attributes.
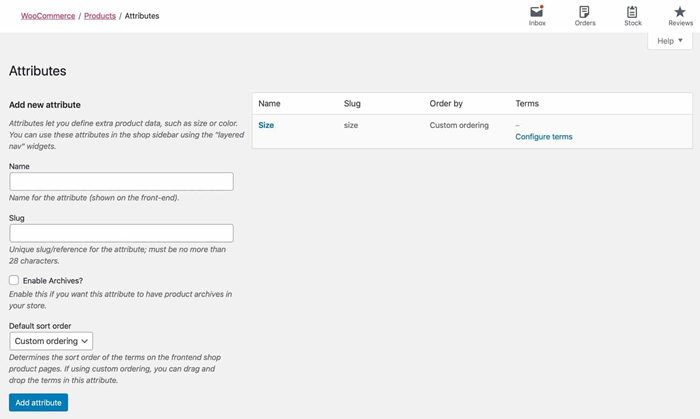
Product attributes screen
When creating a new attribute, you use the strong>Slug field to set the slug the same way you would for a tag or category. Alternatively, to edit the slug for an existing attribute, click the strong>Edit link beneath that attribute in the right-hand list.
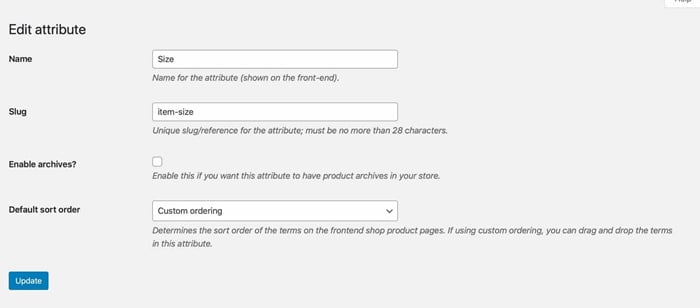
Editing product attribute slugs
Click strong>Update to save your changes.
To edit the attribute term slugs, go to the attributes screen and click the strong>Configure terms link next to the attribute. This will take you to the list of terms for that attribute.
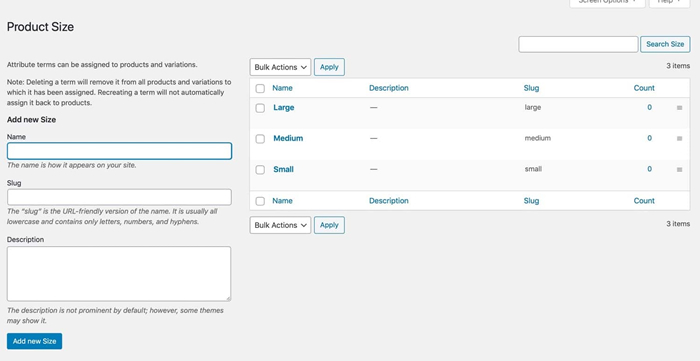
Product attribute terms listing
Now edit the slug for that term just as you would for a category or tag. This will then be added to the URL for the archive for products that have that term.
Changing Product Permalinks
You edit product permalinks via strong>Settings > Permalinks. Scroll down to the strong>Product permalinks section.
Need a blazing-fast, reliable, and fully secure hosting for your new website? Atakdomain provides all of this and 24/7 world-class support from WordPress experts. Check out our plans

Product permalinks settings
Here you can choose from four permalinks settings for your products:
- strong>Default: If you’ve already activated pretty permalinks, this will use the slug of each product with the /product/ base.
- strong>Shop base: Instead of using /product/, your store will use /shop/.
- strong>Shop base with category: Inserts the category of the current product into the URL. This might add keywords that you want to target if your product categories reflect those, but won’t help your UX as it creates long URLs.
- strong>Custom base: Creates your own URL structure using the words that apply to your store. You can’t remove the base entirely, you have to use something.
Once you’ve chosen the option you want, click the strong>Save Changes button to save your choice.
You can also edit the slug for an individual product in the product editing screen, in exactly the same way you would for a post or page.
How to Change WordPress Permalinks With a Plugin
You can use a third party plugin to make amendments to your permalink settings over and above what the default WordPress Permalinks settings screen lets you do.

Custom Permalinks WordPres plugin
- The Custom Permalinks plugin lets you set the URL of any post category or tag to whatever you want. It also sets up redirects so the old URLs will still work.
- The Permalink Manager Lite plugin supports custom post types as well as custom taxonomies in the pro version. It also includes redirects and works with third-party plugins such as WooCommerce and Yoast.
How to Change WordPress Permalinks in phpMyAdmin
If you know what you’re doing and are sure you won’t break anything, you can also edit permalinks in phpMyAdmin.
This is something you might need to do if you can’t access the Permalinks settings screen for any reason.
Start by backing up your database. You’re going to be directly editing it so it’s important to back up in case you make a mistake.
Access phpMyAdmin.
If you’re a Atakdomain customer, you do this by logging in to MyAtakdomain and then selecting the site you want to work with.
Scroll down in the Info screen and click the strong>Open phpMyAdmin button.
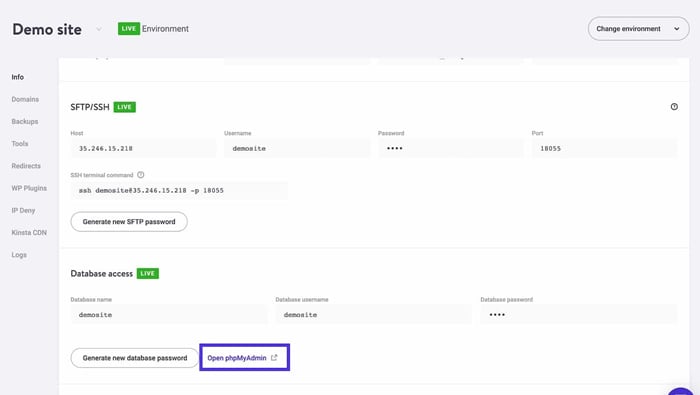
Open phpMyAdmin in MyAtakdomain
Type in your database username and password to access phpMyAdmin. You can retrieve these from the Info screen.
Click on the strong>Databases tab at the top and then select the database you want to work with.
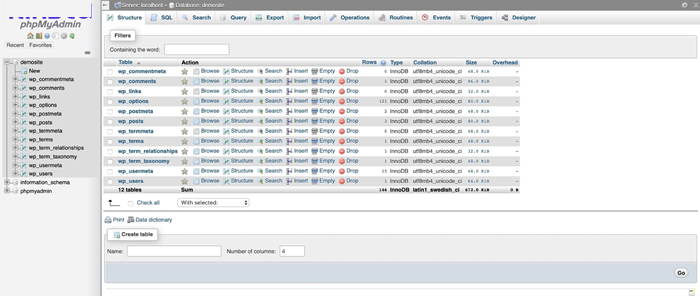
Database structure in phpMyAdmin
Select the strong>wp_options table and find the strong>permalink_structure entry in the strong>option_name column. You might need to navigate beyond the first page of entries.
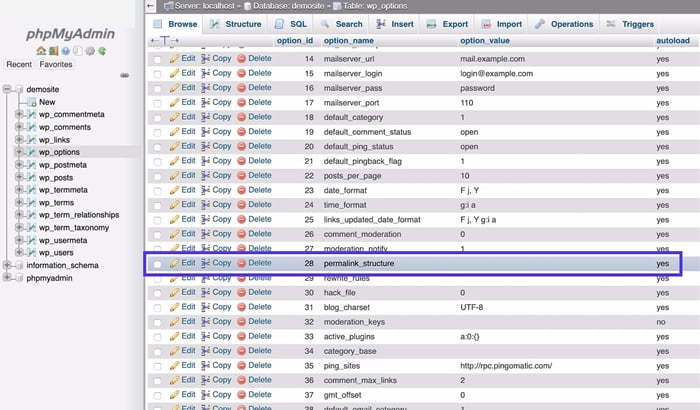
Finding the permalink_structure entry
Click the strong>Edit link on the left for that entry then under the strong>option_value field, add the permalink structure that you want to use. Use the tags that we identified earlier for use in the Permalinks settings screen.
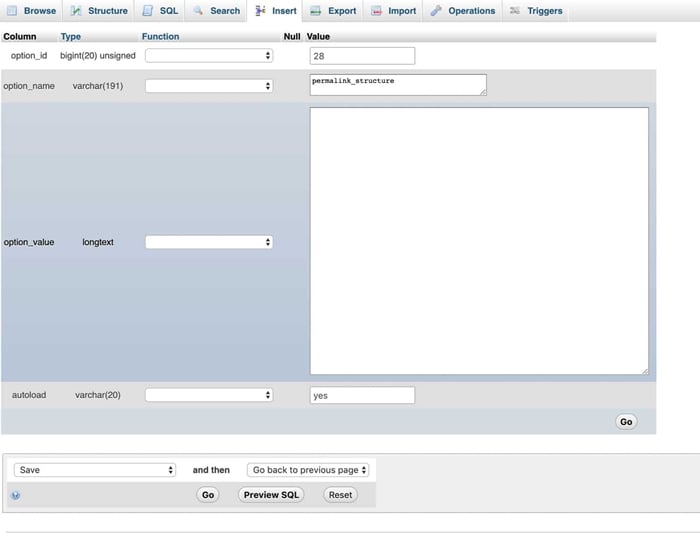
Editing the permalink structure
Click strong>Go. Now your permalinks will be updated.
For further reading, check out our article: How to Change Your WordPress URL or video:
Working with Image Permalinks
Images have permalinks all of their own, and each image or media file you upload to your site will have a number of links created for it:
- The link to the image you uploaded – the original image.
- Links for the new images that are generated using the media sizes you set via strong>Settings > Media.
The Link to the Original Image
When you upload an image, a unique link will be created to the file where it is stored on your server. This will include the path to where it is kept, which is wp-content/uploads.
It will also include the date in which you uploaded the image. This means that if you upload another image with the same file name next month (or next year), the images won’t be confused as they’ll have unique file paths.
If you upload an image called strong>funnycat.jpg on 1 April 2020, its link will be strong>yoursite.com/wp-content/uploads/04/funnycat.jpg. The strong>04 indicates that the file was uploaded in April. WordPress creates a numbered folder in the uploads directory for each month.
If you uploaded a file that wasn’t an image, the URL would work in the same way: strong>yoursite.com/wp-content/uploads/04/document.pdf.
If you upload more than one file with the same name in a given month, WordPress will append a number to the end of the file name. So if I upload another image called strong>funnycat.jpg, it will call it strong>funnycat-1.jpg.
If you ever need to link to the original image or find it to check it’s working correctly, this is how you find the link.
You can also find the link to the attachment file by going to strong>Media > Library and clicking on the file. The editing screen will be displayed for that file and you can find its URL in the strong>File URL field on the right-hand side.
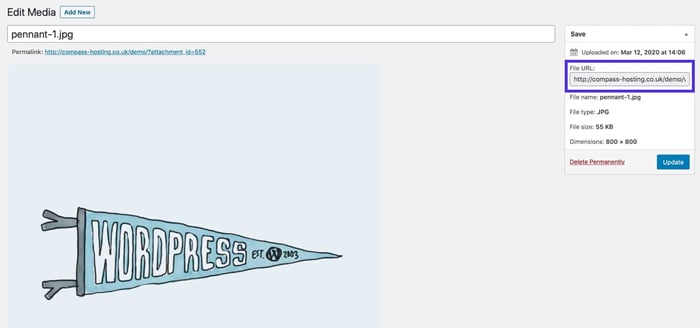
Original image link
You can also link to the file using the wp_get_attachment_image() function provided by WordPress. This is a better practice as it means the link won’t change if the attachment is moved in the future. This is a function you would use in a plugin or a theme template file, and it uses the unique ID of the attachment file.
In the case of my strong>funnycat.jpg image, the ID is strong>4995. I can get this by going to the image editing screen and clicking on the URL for this screen at the top of the browser window. The final digits will be the ID.
To fetch this image in a template file or plugin, I would use this code:
span style="font-size: small;"><?php wp_get_attachment image( ‘4995’ ); ?>
This would fetch the full-size image. If I wanted to output it I would add echo:
<?php echo wp_get_attachment image( ‘4995<span style="color: #000000;">’ ); ?>
Permalinks to Different Sized Images
WordPress will also create images using the file size settings that have been configured for your site. You do this by going to strong>Settings > Media.
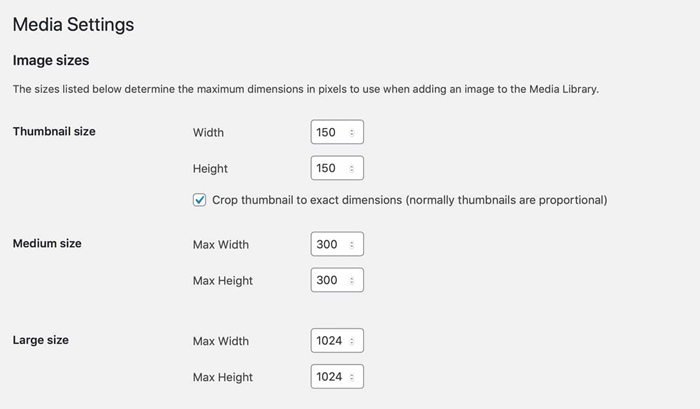
Media settings screen
So if your image is already bigger than the large setting, it will create three images – large, medium, and thumbnail.
It doesn’t name them using these conventions because you might change the setting for those in the future. Instead, it uses the dimensions of the file within the filename and saves them to the same place as the original image, in the month folder in wp-content/uploads.
The easiest way to find the links is to look at your FTP client and find all of the images uploaded in a given month.

Uploaded images in FTP client
Let’s take the image I’ve uploaded to my site called funnycat.jpg. You can see it in the screenshot above.
WordPress has also created extra files using the file size settings for my site:
- funnycat-150×150.jpg
- funnycat-222×300.jpg
- funnycat-300×200.jpg
- funnycat-757×1024.jpg
- funnycat-768×1040.jpg
- funnycat-1135×1536.jpg
- funnycat-1513×2048.jpg
There are more than the standard ones there because I’m using plugins that make use of extra image sizes and have set an additional custom size for one of my page templates in the theme. But you could use the link to any of these as a hard link if you wanted to.
However a better option if you wanted to link to the image, would be to use the wp_get_attachment_image() function we’ve already looked at, and add an extra parameter for the image size.
So to output the medium-sized image, you would use this:
<?php echo wp_get_attachment image( ‘4995’, ‘medium’ ); ?>
That’s a much more robust way of fetching the image than creating a hard link in your code.
How to Redirect Permalinks for Different Content Types
Editing the slug for an existing post, or changing the permalink settings overall, might cause a problem if you’ve previously shared posts using the old links. If someone then clicks on those links, they’ll be taken to a 404 page.
You can fix this by creating redirects from the old links to the new ones.
Redirecting Individual Posts and Pages
To redirect the old slug from a post to the new one, you’ll need to set up a redirect rule for those two URLs.
If you’re with Atakdomain, you can create redirect rules in the MyAtakdomain dashboard.
Find your site, and then click the strong>Redirects option in the menu.
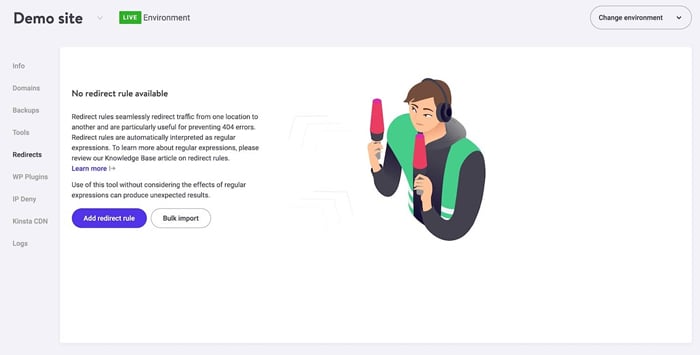
Redirects in MyAtakdomain
Click the strong>Add redirect rule button to open the redirect rules popup.
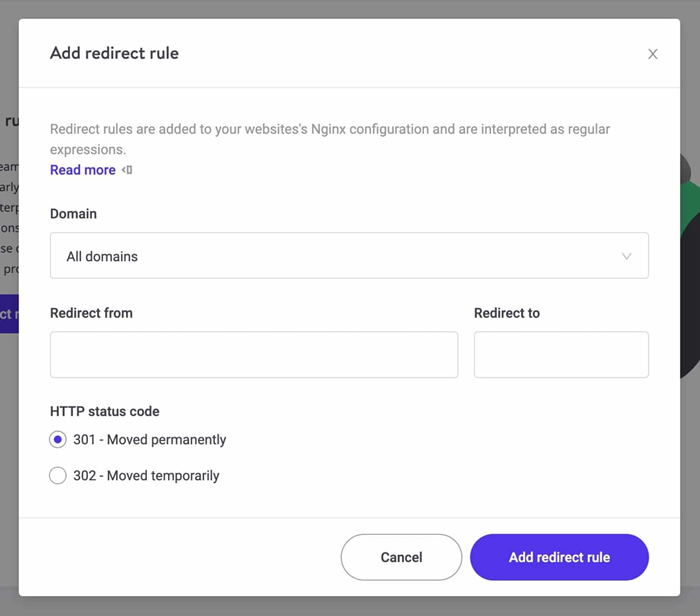
MyAtakdomain add redirect rule
To add your redirect, select strong>301 redirect, then type in the old slug as the strong>Redirect from value and the new slug as the strong>Redirect to value.
Click the strong>Add redirect rule button and your redirect will be set up.
If you aren’t with Atakdomain, you can use a redirection plugin to set up redirects. The Redirection plugin is the most popular. It will let you set up redirects manually and it will also monitor changes to your slugs and automatically set up redirects for you. Be careful to avoid redirect loops, as these result in the ‘too many redirects‘ error, preventing pages from loading.
Below you can see that I’ve changed the slug for one of my posts and the plugin has caught it and set up a redirect rule.
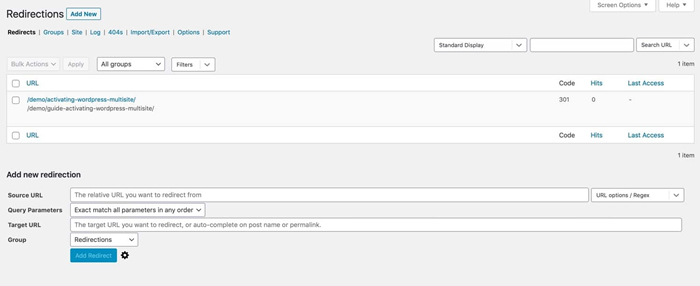
Redirection plugin redirect rule set up
Redirecting Archive Pages
If you change the structure of your archive pages using the Optional section in the Permalinks settings page, anyone using the old link to a category archive will be taken to your 404 page. So you’ll need to set up a wildcard redirect.
In MyAtakdomain, create a redirect rule that uses the base structure you were using before and the one you’re using now, with an asterisk to denote a wildcard after it.
In the strong>Redirect from field, type the old path to categories, with a wildcard. It needs to take the form strong>/oldslug/(.*)$. The entry for strong>Redirect to needs to take the form strong>/newslug/$1.
So if you’ve changed your category URL structure to use strong>blog before the category name instead of the default strong>category, you would enter strong>/category/(.*)$ in the strong>Redirect from field and strong>/blog/$1 in the strong>Redirect to field.
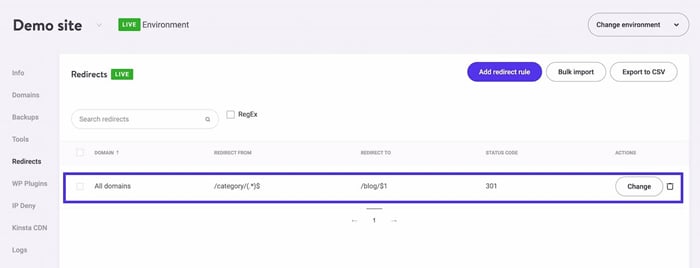
Adding a wildcard redirect in MyAtakdomain
If you’re using the Redirection plugin, you’ll need to enable Regex functions first, as the wildcard asterisk is a regex function.
Go to strong>Tools > Redirection and go to strong>Add new redirection section of the screen.

Creating a new redirect rule with the redirection plugin
Click on the strong>URL Options/Regex drop down and check the strong>Regex box.

Setting up a wildcard redirect with the Redirection plugin
In the strong>Source URL field, type the old path to categories, with a wildcard. It needs to take the form strong>/oldslug/(.*)$. The entry for strong>Target URL needs to take the source strong>/newslug/$1. This works in exactly the same way as in MyAtakdomain.
strong>Check out our video guide to WordPress Redirect Best Practices:
Troubleshooting WordPress Permalinks
Occasionally you might find that permalinks don’t work as you expect them to. Here’s what to do if that happens.
Permalinks Not Working After Registering a Post Type
Sometimes you register a new post type or taxonomy and the links to the relevant archive pages or to posts of the post type don’t worry.
Don’t panic! This is simply because WordPress doesn’t know that the custom post type or taxonomy means a change to permalink settings. Simply go to strong>Settlings > Permalinks to refresh settings. You don’t even need to make any changes or click the strong>Save Changes button – just opening the screen will be enough.
Permalinks Not Behaving the Way You Want Them To
If your permalinks aren’t working the way you expect and it isn’t because you just registered a custom post type or taxonomy, try these tips.
- Check that you typed in the URL correctly in the browser.
- Go to strong>Settings > Permalinks and check the setup. Are the tags correct? Make sure you haven’t missed anything or used the wrong syntax.
- Clear your website’s cache if you’re using a caching plugin. Caching can interfere with changes to links.
- If you’ve changed permalinks settings, you might have links in the body of your website content that are now out of date. Edit them or set up redirects.
- Check if you have manually changed the slug for any posts and if these need editing.
- Check whether you have a redirection plugin installed or a plugin that includes redirection. If so, check what redirects you’ve added to the settings.
- If you have any plugins that affect post types or links, try deactivating them and seeing if that fixes the problem.
- If you can’t access the Permalinks settings screen, use the method detailed earlier to edit permalinks via phpMyAdmin.
Follow these tips and you should be able to get your permalinks working as they should.
Summary
Permalinks are an incredibly useful feature of WordPress. You can use them to enhance user experience and boost your search engine rankings.
If you follow the guide above, you’ll have permalinks that are optimized. You’ll be able to configure them to work in exactly the way you need them to, for all post types, taxonomies, and custom slugs.
Now, it’s your turn: how do you manage your permalinks? Did we forget to cover anything about WordPress permalinks? Let us know in the comments below!
Save time, costs and maximize site performance with:
- Instant help from WordPress hosting experts, 24/7.
- Cloudflare Enterprise integration.
- Global audience reach with 28 data centers worldwide.
- Optimization with our built-in Application Performance Monitoring
Categories
- Domain Guide & Registration Process
- Email Services & Setup Instructions
- Step-by-Step How-To Guides
- Insights & Articles from the Tech World
- Server Management & Performance Tips
- Software Development & Coding Resources
- SSL Certificate Guide for Secure Websites
- Choosing the Best Hosting & Optimization Tips
- Key IT Terms & Their Definitions
- SQL Database Management & Queries
- WordPress Setup & Optimization Strategies


