
Increase maximum upload size in WordPress

The low WordPress upload limit limits your uploading of large files, plugins, and themes. If you are building a media-based website, this can be a major obstacle. In this case, you need to increase the maximum load size of WordPress or your server (or both).
Try a free demo
Depending on your server and hosting server, you can solve this problem in multiple ways. We will introduce them all in this article and show you how to quickly increase the upload size in WordPress.
Let's go in!
contents
1. What is the maximum load size of WordPress?
2. How to check the minimum load size in WordPress
3. Why increase the file size in WordPress?
4. 10 ways to increase the maximum upload file size in WordPress
5. Modify the'wp-config.php' file
6. Adjust the file size of the WordPress website New Max
Do you want to watch the video version?
What is the maximum upload size for WordPress?
Uploading large files to the server consumes a lot of server resources. To prevent users from running out of server time, the maximum custom load size in WordPress usually varies from 4 MB to 128 MB. Typically, hosting providers set this limit at the server level.
WordPress also contains constants that specify this limit, but in most cases, they cannot track server-level settings.
information
The maximum downloadable file size in Atakdomain is set to 128 MB.
To resolve this issue, go to the media library of the WordPress website. Here, try to load a file that exceeds this maximum file size limit. You will see an error message as shown below:
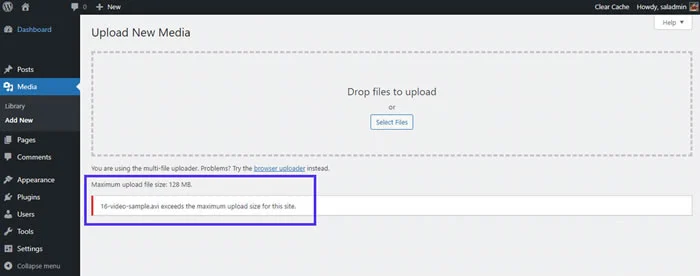
An error occurred while loading large files in WordPress
The "maximum load size for this site exceeded" error may be disturbing, but it has two main reasons: safety and efficiency. It prevents website owners and other users from uploading large files (for example, high-resolution images, large videos), despite malicious actors.
Or, it may cause your web server to crash, which can cause your website to crash. Or worse, it can completely destroy your website!
One controls the current minimum load size in WordPress
There are many ways to control the maximum load size of an existing WordPress site. Let's take a look at them.
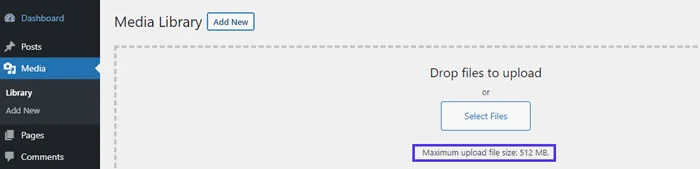
In the media library
The fastest way to control the maximum load size of your website is to go to the WordPress dashboard and from there go to Media> Library. Here, click the "Add" button to activate the media upload tool.
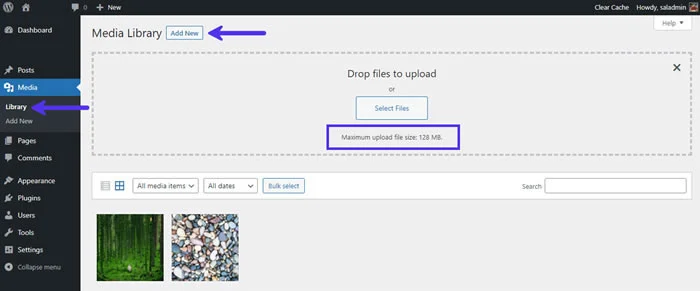
"Maximum Upload Size Limit" in WordPress
Since Atakdomain hosts this site, the maximum file size: 128 MB. This message appears below the "Select File" button. If you use a different web hosting provider, you may find that the restrictions listed here are different.
You can also go directly to Media> Add and view the same message as shown below.
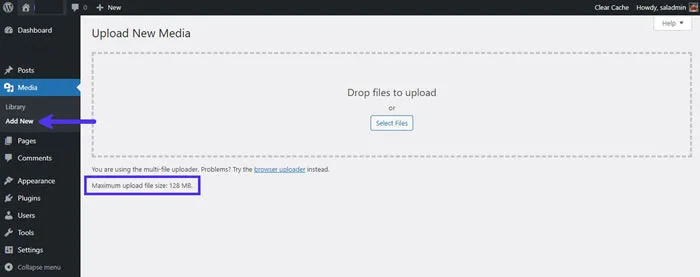
"Max upload size" in the WordPress media library.
Again, you can find the maximum file size of 128 MB here.
In the site health information
WordPress 5.2 adds a website health information tool to help you better customize your WordPress website. Here, you can find almost all information about your server and WordPress configuration.
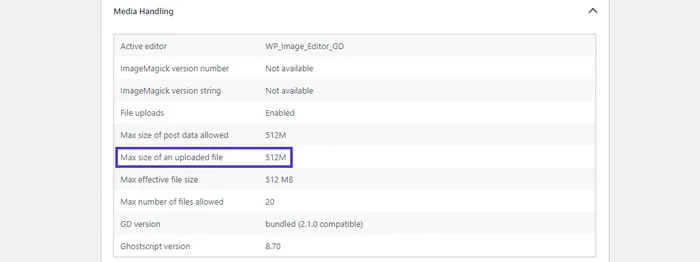
Since both the server and WordPress have the maximum file size, there are two ways to view its value on this screen.
First, you can see it is listed under the "Media Management" tab. Here, check the Max size value of the loaded continuous file.
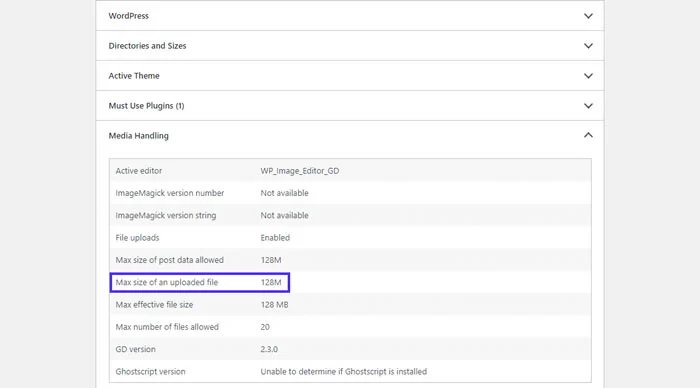
"Media Organization" settings in the "Website Health Information" panel
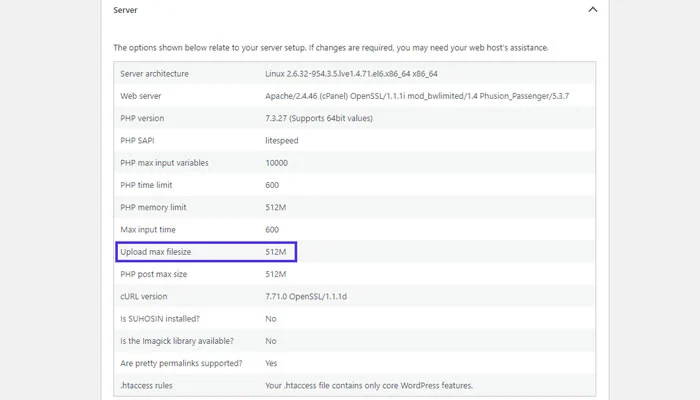
The second method is to watch Server download. Here you will find many options related to setting up a web server. Please look at the upload value of the continuous file size to see what it is. On this site, the maximum file size limit is 128 MB.
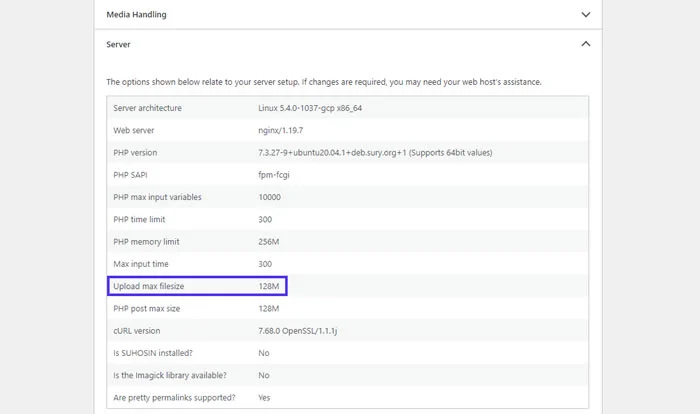
"Server" settings in the "Site Health Information" panel
You can also view other PHP extensions and their values, for example:
• Maximum PHP post size: Specify the maximum upload limit for POST requests.
• PHP memory limit: Specify the memory allocated to PHP. It must be set equal to or higher than the maximum upload file size limit. Otherwise the load will not fail.
Your web host provides these options. Generally, the initial hosting plan will be less than the enterprise hosting plan with a smaller load limit. Some hosts may allow you to overcome these restrictions. But in most cases, you may need the help of a hosting provider (and possibly a planned upgrade) to add them.
Why increase the minimum file upload size in WordPress?
There are many reasons why you may need to maximize the file size of your WordPress site. The following are the most common:
• You want to install large themes or plugins directly through the WordPress management panel.
• Regularly updating your WordPress site is an important way to attract readers and get them back for more information. It will regularly upload new photos, videos, audios and other media. However, this is not always feasible when the size of the file you upload is limited.
• You want to upload a large video or image as the title or title of your website.
• You plan to sell digital files such as e-books, photos, videos, themes, and attachments directly from your website. Sometimes these files can run hundreds of megabytes (or more).
Now that we have mastered the basics of maximizing file size in WordPress, let us learn how to increase it.
10 ways to increase the maximum upload file size in WordPress
There are many ways to solve the problem of maximum WordPress upload size. We will start with the simplest course first, and then we will move on to the intermediate course.
1. Contact your hosting provider for help
2. Increase the maximum upload file size in WordPress Multisite
3. Update your ".htaccess" file
4. Create or modify the'php.ini' file
5. Create or modify the'.user.ini' file
6. Change PHP settings via cPanel
7. Increase the maximum upload file size of Nginx
8. Use WordPress filter "upload_size_limit"
9. Use WordPress plugins
10. Upload files via FTP/SFTP
Contact your hosting provider for help
If you are having problems uploading files and file size limits, one of the quick solutions is to help contact your hosting provider. Increasing the shipping quota for technical support is a perfect task, so many hosting companies can help you solve this problem quickly.
Deleting your server or website configuration files at any time can be a challenge. Therefore, we always recommend that you try this method first.
If you use Atakdomain to host your website, with just one click, our knowledgeable support team will be available 24/7. First, go to your MyAtakdomain dashboard and click on the chat icon in the bottom right corner.
Easily contact Atakdomain support with MyAtakdomain
Our representatives can assist you in multiple languages, including English, Spanish, French, German, Italian, and Portuguese.
Increase the maximum upload file size in WordPress Multisite
If you are running a multisite WordPress network, you can change the maximum file size of the network.
First, go to your network administrator panel, and then go to Settings> Network Settings. Here, scroll down until you see the "Load Settings" section. You will find the largest upload size file area in this area.
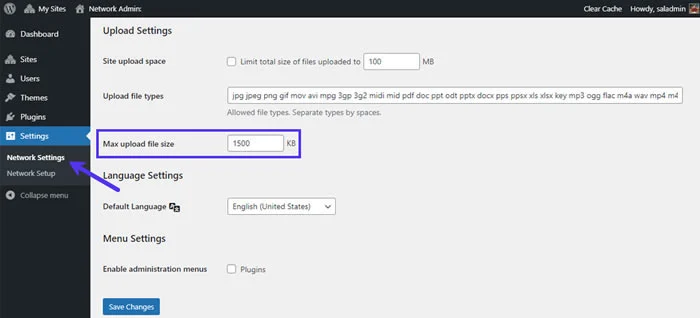
"Maximum upload file size" field in "Network Settings"
The maximum file size that can be uploaded in the WordPress browser is 1500 KB (~ 1.5 MB). You can change it to a higher value and click the "Save Changes" button.
Note: You cannot cross the maximum server load level limit from here. If the limit you set here is higher than the maximum server size limit, the server will ignore it. You can use the above method to view the server configuration.
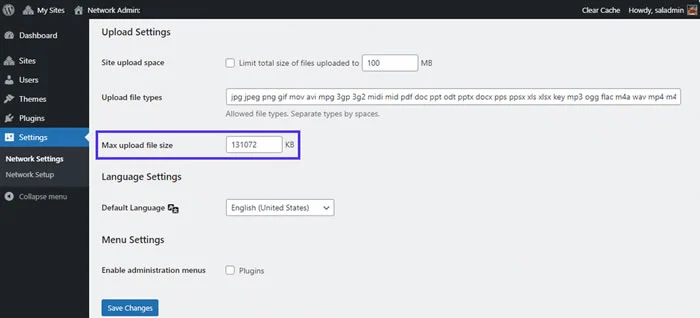
New "Maximum File Size" in "Network Settings"
Here, we set the maximum downloadable file size to 131072 KB (~ 128 MB).
You can also limit the total size of files uploaded to personal websites in a multi-site network. However, it has been naturally shielded.
Update your ".htaccess" file
If your web server is running on Apache, you can update your site .htaccess file to maximize the load size in WordPress. You can find the .htaccess file in the root directory of your WordPress site.
According to the PHP documentation, there are three PHP guides responsible for how WordPress handles uploads. they are:
• upload_max_filesize
• post_max_size
• limit_member
We have discussed them in the health information section of the site above. It will help you to change all three paths to accept the file size. For example, if the largest file you plan to upload is 32 MB, we recommend that you set the following:
• upload_max_filesize = 32M
• post_max_size = 64M
• limit_ memory = 128M
Note that all values ??are used in place of MB M. This is how PHP gets instructions.
In addition to the file itself, the upload may also contain other information. Therefore, it is a good idea to provide all other routes related to loading some breathing space. For more information, you can read my in-depth course on how to improve PHP memory limits in WordPress.
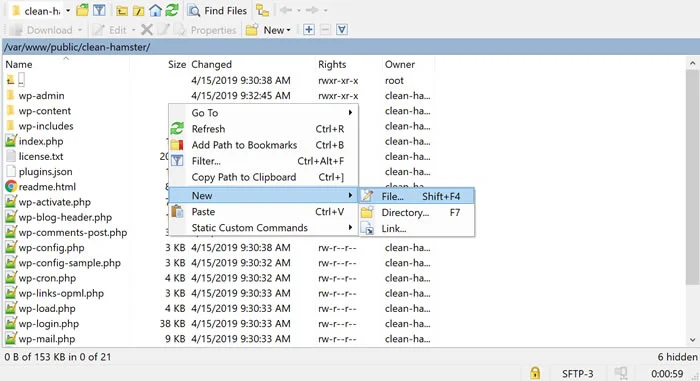
Access your .htaccess file via FTP / SFTP or the file manager of the hosting service provider.
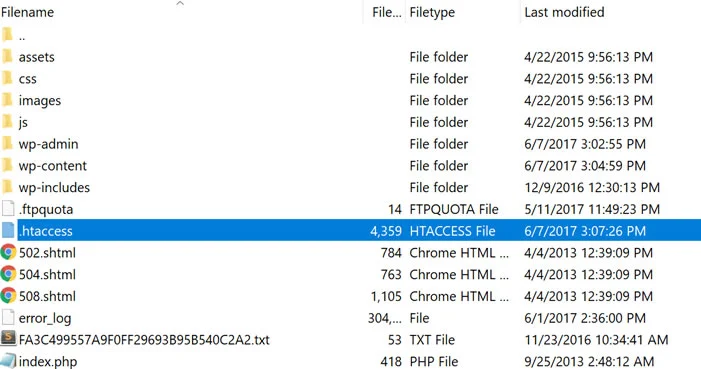
View ".htaccess" file
Use a text editor or code editor to open the .htaccess file and add the following code:
php_value upload_max_filesize 32M
php_value post_max_size 64M
php_value memory limit 128M
php_value max_execution_time 300
php_value max_input_time 300
You can find two other PHP methods in the code above: max_execution_time and max_input_time. They specify how much the server spends on a single PHP task. The greater the load, the longer it takes. You need to set their value to a number suitable for your use case.
Note: After using the above method, you may receive 500 Internal Server Errors. Most likely because your server is running PHP in CGI mode. In this case, you cannot use the above commands in the .htaccess file.
Create or modify the "php.ini" file
The php.ini file is where you specify to make changes to custom PHP settings. Usually, it contains the path that specifies the file time, maximum load size, and resource limit.
Using SSH or FTP, you can find the php.ini file in the WordPress root directory. In some cases, you may not find it there. do not worry! You can create a new file with the same name in the root directory of the website.
How to create a new php.ini file
Using a code or text editor, add the following code to an existing or new php.ini file:
Maximum upload file size = 32M
post_max_size = 64M
limit_member = 128M
Don't forget to save your file after making changes. Some hosts do not allow you to change PHP settings in this way. In this case, you can try the following solutions.
Want to know how we increased traffic by 1000%?
Join over 20,000 people to receive my weekly newsletter, which includes a built-in WordPress plugin!
Subscribe now
Create or modify the ".user.ini" file
If your hosting provider has configured general PHP settings, it may have configured the server to run a .user.ini file instead of a php.ini file.
Like php.ini and .htaccess files, you can find .user.ini in the root directory of the website. If you cannot find it, you can create a new .user.ini file in the same location. Follow the same process as the previous method to create a new php.ini file.
Next, add the following code to your .user.ini file:
Maximum upload file size = 32M
post_max_size = 64M
Limit_memory = 128M
You will notice that it is a duplicate of the previous method, but the file name is different.
Use cPanel to modify PHP options
If your hosting provider uses the cPanel dashboard to help you manage server and website settings, you can use it to change the maximum file size for upload.
First, go to your cPanel dashboard and select the PHP version under the "Software" section.

Click "Select PHP Version" in the cPanel dashboard
Here, you can modify the existing PHP version of the server and enable/disable many PHP extensions. Click the option chain in the navigation menu to go to the PHP options panel.
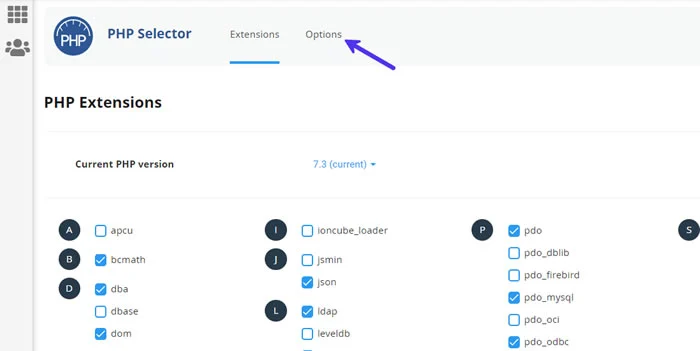
Go to the "PHP Options" setting in cPanel
Search here to change the values of upload_max_filesize, post_max_size, memory_limit, max_execution_time, max_input_time and other PHP directories. The maximum value you can set here depends on your current hosting plan.
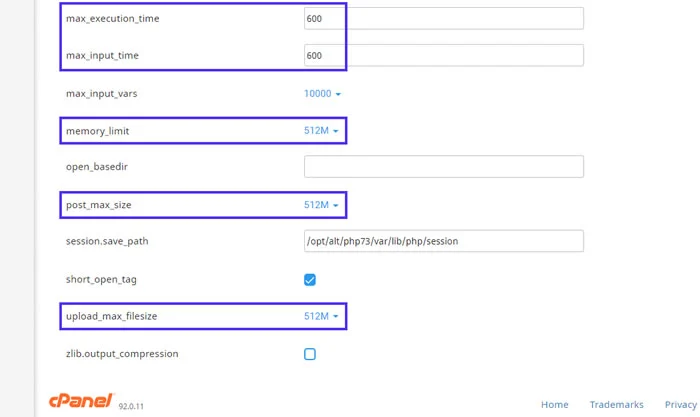
"PHP Options" screen in cPanel
If you have any questions about these values, we recommend that you contact your hosting provider. The latest cPanel spreadsheet will automatically save changes, so you don’t need to buy anything. But if you are using an older version of cPanel, be sure to click the "Select option" button.
Increase the maximum upload file size in Nginx
Nginx is another web server similar to Apache, but it is also very popular. Generally speaking, Nginx can handle more concurrent requests than Apache, and its processing speed is much faster. Atakdomain uses Nginx to enhance its performance-optimized hosting solution for WordPress.
If you are running a WordPress site on Nginx, you need to modify the php.ini and nginx.conf files. We have processed the last file. The last one is called the Nginx configuration file.
On the Nginx server, you can find the php.ini file in /etc/php/7.4/fpm/php.ini. Depending on the version of PHP you have installed, the actual path may be slightly different.
upload_max_filesize = 64M
post_max_size = 128M
You don't need to specify memory_limit in the above file because Nginx will handle it differently. For more information, you can check this Stack Overflow topic. After saving the php.ini file, PHP will restart PHP Restart PHP Use the following code to enable the changes in the terminal:
php7.4-fpm sudo function restart
Again, the actual code may be slightly different, depending on the version of PHP installed on the server.
Next, use the Nginx client client_max_body_size to set the maximum maximum load size limit. You should notice this process in the nginx.conf file, which can be found in /etc/nginx/nginx.conf.
You can report this path in the http {... bl block, bl ... server server block, or {... cî location.
Tired of slow WordPress hosting? Our optimized performance provider can provide content to your guests almost immediately. Check out our hosting plans
Installing it in the http block will affect all websites/applications hosted on that server.
http> {
...
client_max_body_size 128M;
}
Defining it in the server block will only affect the specific site/application hosted by that server.
server {
...
client_max_body_size 128M;
}
Blocking a location will only affect the specified directory (eg files, uploads) in the website/application.
location /files {
...
client_max_body_size 128M;
}
Don't forget to save the file and restart Nginx to make changes. To do this, you can use the following command in the terminal:
Reload the sudo nginx function
If you are a Atakdomain client, you cannot directly access the Nginx configuration. However, you can contact our support team and they can quickly make changes for you.
Use WordPress filter "upload_size_limit"
WordPress 2.5 introduced the upload_size_limit filter to filter the maximum upload size allowed in php.ini. WordPress themes also use this filter to show you the maximum load size allowed, for example in media library screens and website health information.
Below is an example of this filter from WordPress contributor Drew Jaynes. It sets load size limits for all non-administrative roles.
/**
* Filter the upload size limit for non-administrators.
*
* @param string $size Upload size limit (in bytes).
* @return int (maybe) Filtered size limit.
*/
function filter_site_upload_size_limit( $size ) {
// Set the upload size limit to 10 MB for users lacking the 'manage_options' capability.
if ( ! current_user_can( 'manage_options' ) ) {
// 10 MB.
$size = 1024 * >10000;
}
return $size;
}
add_filter( 'upload_size_limit', 'filter_site_upload_size_limit', 20 );
The above code uses the WordPress management_options function to set this limit for non-administrators. You can modify the code to target a specific user role or user identity. Read our in-depth WordPress roles and features article to learn more.
Use WordPress plugin
Using SSH or FTP/SFTP to communicate with the code is not for everyone. If you are not used to writing or editing code, you can use the WordPress plugin instead.

WP extension file size plugin
We will use the WP upload file extension here. At the time of writing, it is the only latest plugin in the WordPress plugin repository that can help you do this.
First, install and enable the maximum upload file size WP plugin. Next, go to the settings screen in the WordPress dashboard. Here you can find the maximum upload file size specified by the hosting provider and WordPress.
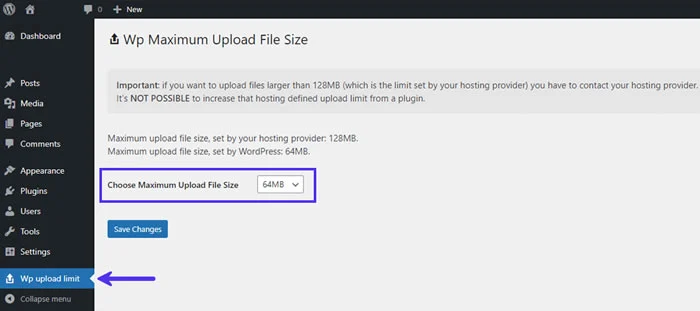
WP extension file size setting screen
Here, you can see that the maximum file upload size specified by WordPress is smaller than the size specified by your hosting provider. Therefore, you can adjust its size by selecting the largest upload file size available for download.
Note: If the maximum upload file size limit you want to set is greater than the limit specified by your hosting provider, you cannot use this plugin to perform this operation. To do this, you need to contact your hosting provider.
Upload files via FTP / SFTP
Are you still troubled by all the above methods? Or increase the file size limit with your hosting provider? You can always upload large files via FTP / SFTP.

Download the SFTP file and download it to your server and computer
This is the fastest method if you want to load a large number of large files. For more information, you can read my in-depth course on how to bulk upload files to the WordPress media library.
Sometimes, WordPress cannot recognize files uploaded via FTP/SFTP. If so, you can use the free Add From Server plugin to upload the uploaded files to WordPress.
Alternatively, you can do the same directly from the command line by importing images using WP-CLI. The wp media import command allows you to create attachments from local files or URLs.
Do not edit the "wp-config.php" file
Modifying the wp-config.php file is no longer valid. We will add it here because we have seen many site tutorials addressing it as a legal way to increase the maximum upload size in WordPress.
They enter the root directory of your website via FTP / SFTP or SSH, and then modify the wp-config.php file.
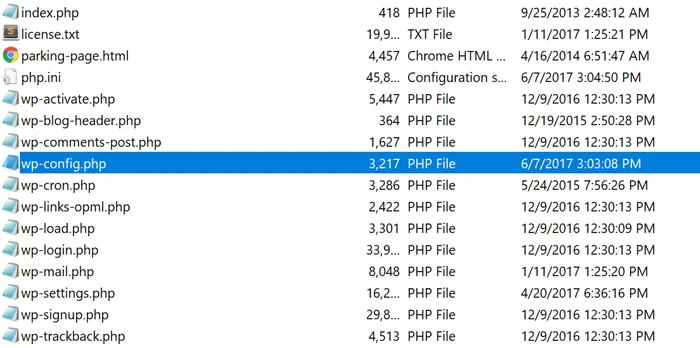
View the file "wp-config.php"
It is recommended that you add the following code in the wp-config.php file:
@ini_set( 'upload_max_size' , '64M' );
@ini_set( 'post_max_size', '128M');
@ini_set(> 'memory_limit', '256M' );
It does not work because you can only use the ini_set() function to execute the PHP instructions associated with the PHP_INI_ALL modifier.
Because upload_max_size and post_max_size depend on the PHP_INI_PERDIR variable mode. You can only install them via php.ini, .htaccess, http.conf or .user.ini.
If you have tried this method before but did not see any results, now you know why it failed.
Adjust the maximum file size of your WordPress website New Max
Finally, it’s time to make sure to implement a new upload maximum file size limit on your WordPress site. To do this, follow the same steps we mentioned above to check the maximum upload size of files in WordPress.
In the WordPress dashboard, go to your media library and check if the maximum file size limit has changed.
Specify the maximum upload size in the "Media Library"
Yes, it has changed. This is a success!
You can also go to the website health information panel and check under the media authorization and provider folders.
Correct the newly uploaded maximum file size in "Site Health Information>Media Library"
Correct the newly uploaded maximum file size in "Site Health Information> Provider"
As you can see, increasing the maximum file size in WordPress is not very complicated. Whether you are building a website with a large media portfolio or setting up a great theme, it’s just a matter of where you look and the commands or tools you use.
In most cases, visiting your hosting provider is sufficient. However, if you encounter a difficult host, we show you some alternative methods so that you can try a better host before you set off.
Get the load!
Did we all get it? If you encounter the stubborn situation of loading file size limits, please tell us how you did it.
_______________________________________
Save time, money, and improve website performance by:
• Instant help from WordPress hosting experts, 24/7.
• Cloudflare Enterprise integration.
• A global audience reaches data centers around the world.
• Use our built-in application performance monitor for optimization.
Categories
- Domain Guide & Registration Process
- Email Services & Setup Instructions
- Step-by-Step How-To Guides
- Insights & Articles from the Tech World
- Server Management & Performance Tips
- Software Development & Coding Resources
- SSL Certificate Guide for Secure Websites
- Choosing the Best Hosting & Optimization Tips
- Key IT Terms & Their Definitions
- SQL Database Management & Queries
- WordPress Setup & Optimization Strategies
Random Articles

The Rise of Personal Branding: How Unique Domains Can Define Your Online Legacy
25.01.2024
Shareaholic Review: A Suite of Audience-Engaging WordPress Tools
16.02.2022
How to Stop WordPress Registration Spam (Plugins and Tactics)
17.01.2022
What is the top level domain?
20.09.2024
Django or WordPress?
02.12.2021