


How to Install an SSL Certificate on Plesk Panel?
Installing SSL on Plesk Panel comes down to two things: uploading your certificate file and turning on HTTPS. If you've already generated a CSR and completed domain validation, this guide will walk you through the rest - with screenshots at every step.
There are two ways to upload your certificate in Plesk: by pasting the certificate code, or by uploading your .crt and .ca.crt files directly. Both methods are covered here.
View SSL Certificates
Don't have an SSL certificate yet? Browse Atak Domain's SSL options.
Plesk SSL Installation: Quick Steps
| 1 | Log in to Plesk - My Account > My Hosting Plans > Web Hosting > Manage. |
| 2 | Open SSL/TLS Certificates - Click the padlock icon on the Plesk dashboard. |
| 3 | Click Manage - Under "Download or remove existing certificates." |
| 4 | Upload your certificate - Method 1: paste the CRT code. Method 2: upload .crt and .ca.crt files. |
| 5 | Open Hosting Settings - From the Plesk main dashboard. |
| 6 | Enable HTTPS and 301 redirect - Tick both checkboxes, select your certificate, click OK. |
| 7 | Verify - Confirm the padlock appears and run the SSL Checker. |
Before You Start
Make sure you have the following ready before beginning the installation:
| SSL certificate | Purchased from Atak Domain and fully validated |
| .crt file | Your primary certificate file - found inside the zip from your certificate issuer |
| CA Bundle (.ca.crt) | Intermediate certificate chain - required for full browser trust |
| Plesk access | Admin-level access to the Plesk Panel for your server |
| Domain name | The exact domain the SSL certificate covers |
How to Install SSL on Plesk Panel: Step by Step
Step 1 - Log In to Plesk Panel
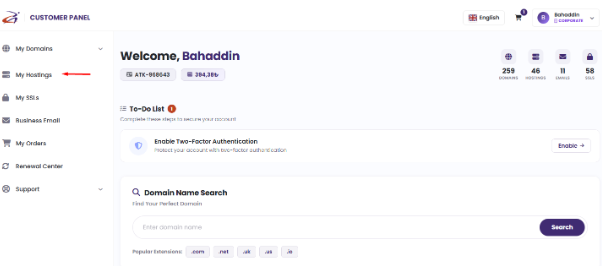
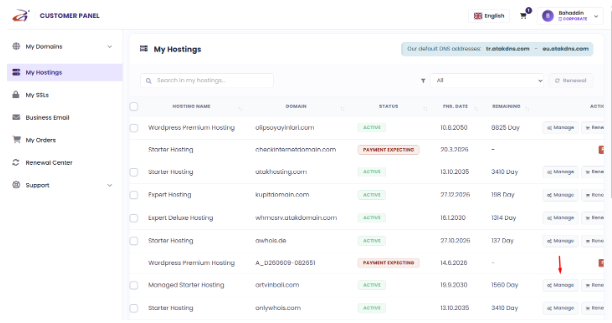
If your hosting is with Atak Domain, go to My Account > My Hosting Plans > Web Hosting. Click the "Manage" button next to your hosting plan.
On the page that opens, click the green "Go to Control Panel" button to launch Plesk.

Step 2 - Open SSL/TLS Certificates
On the Plesk dashboard, click the "SSL/TLS Certificates" button (the padlock icon).

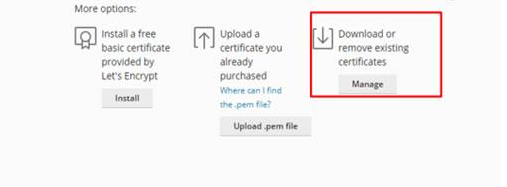
You'll see three options on this screen:
Option 1 - Install a free basic certificate via Let's Encrypt
Option 2 - Upload a purchased certificate as a .pem file
Option 3 - Manage, download, or remove existing certificates → use this for paid SSL installation
For a paid SSL certificate, click the "Manage" button under "Download or remove existing certificates."
Method 1 - Paste the Certificate Code
Use this method if you received your certificate as a .cer or .crt file and prefer to copy-paste the contents.
Step 3 - Click the Certificate Name
On the Manage screen, click the name of the certificate you want to configure.
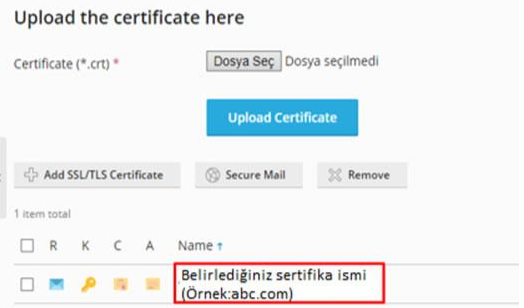
Step 4 - Upload the Certificate
You have two options for adding the certificate:
"Select File" - use the file browser to upload your .crt file directly.
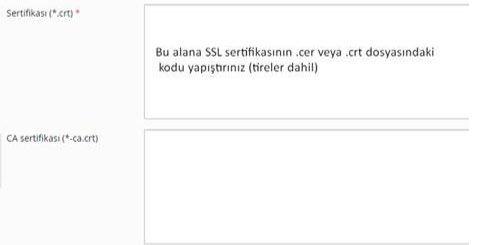
Open your .cer or .crt file in Notepad, copy the entire contents (including the dashes), and paste into the .CRT field.
Click "Upload Certificate" to save.
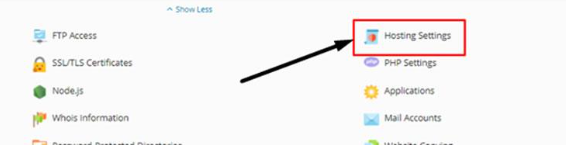
Step 5 - Open Hosting Settings
Go back to the Plesk main dashboard and click "Hosting Settings."
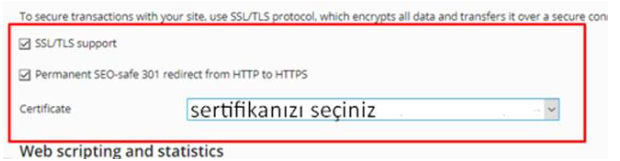
Step 6 - Enable HTTPS and the 301 Redirect
Two settings need to be enabled on this screen:
SSL/TLS support - activates the certificate for this domain.
Permanent SEO-safe 301 redirect from HTTP to HTTPS - automatically sends all HTTP visitors to the secure HTTPS version of your site. The 301 status tells search engines the move is permanent, so your SEO equity is preserved.
Select your certificate from the Certificate dropdown, then click "OK."
✅ Your SSL certificate is now installed via Method 1. Skip ahead to the Verification section.
Method 2 - Upload Certificate Files Directly
Use this method if your certificate provider delivered ready-made .crt and .ca.crt files. It's the more straightforward option when you have all the files at hand.
Step 3 - Click Your Domain Link
On the SSL/TLS Certificates page, click your domain link (yourdomain.com) to open the certificate upload page.

Step 4 - Upload .crt and .ca.crt Files
Under the certificate upload section, select your .crt file and your .ca.crt (CA Bundle) file. Click "Upload Certificate."
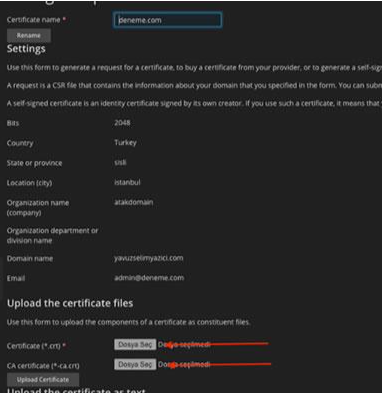
⚠️ Don't skip the CA Bundle (.ca.crt). Without it, some browsers and operating systems can't verify the full certificate chain and will show a security warning.
Step 5 - Open Hosting Settings
Return to the Plesk main dashboard and click "Hosting Settings."

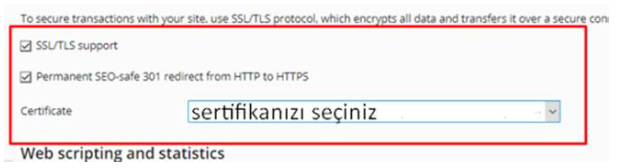
Step 6 - Enable HTTPS and the 301 Redirect
- SSL/TLS support - tick the checkbox.
- Permanent SEO-safe 301 redirect from HTTP to HTTPS - tick the checkbox.
Select your certificate from the Certificate dropdown and click "OK."
✅ Your SSL certificate is now installed via Method 2.
How to Verify Your SSL Installation
Open your website in a browser and confirm the padlock icon appears in the address bar. For a full certificate check, use the Atak Domain SSL Checker:
Run through this checklist after installation:
Site loads over HTTPS
Padlock icon visible in the browser address bar
HTTP automatically redirects to HTTPS
No mixed content warnings (check browser console: F12)
Certificate expiry date noted
Common Plesk SSL Installation Mistakes
These are the issues most likely to block installation or cause the certificate to malfunction:
❌ Wrong certificate uploaded
A certificate issued for a different domain will fail or throw an error.
❌ CA Bundle not uploaded
Incomplete certificate chain; some browsers display a security warning.
❌ HTTPS redirect not enabled
Visitors stay on HTTP even after the certificate is installed.
❌ Wrong domain selected
The certificate may be assigned to a different domain in Hosting Settings.
❌ 301 redirect checkbox left unticked
HTTP traffic is not forwarded to HTTPS; negative SEO impact.
Frequently Asked Questions
Q: How long does Plesk SSL installation take?
A: Once domain validation is complete, the installation itself takes just a few minutes.
Q: Does HTTPS activate automatically after SSL is installed?
A: No. You need to manually enable SSL/TLS support and the 301 redirect in Hosting Settings - both are covered in Steps 5 and 6 above.
Q: Is the CA Bundle required?
A: Yes. Without the CA Bundle (intermediate certificate), some browsers and operating systems cannot verify the full certificate chain and will show a warning.
Q: My SSL certificate isn't working - what should I do?
A: Run a check at https://www.atakdomain.com/en/ssl-checker first. If the issue persists, contact [email protected] - the support team can connect remotely and help.
Q: How do I enable the 301 redirect in Plesk?
A: In Hosting Settings, tick the "Permanent SEO-safe 301 redirect from HTTP to HTTPS" checkbox and click OK.
Q: What's the difference between Method 1 and Method 2?
A: Method 1 involves pasting the certificate code from a text file. Method 2 involves uploading .crt and .ca.crt files directly. Both produce the same result - choose whichever is more convenient.
Q: Does Atak Domain offer Plesk SSL installation support?
A: Yes. If your hosting is with Atak Domain, the technical team can install the certificate directly. Free remote support is also available on request.
Q: I can't complete the installation myself - what are my options?
A: Email [email protected] or [email protected]. The team can connect remotely and handle the installation for you.
Summary
Plesk SSL installation comes down to three things: uploading your certificate, enabling SSL/TLS support, and turning on the HTTPS redirect. The screenshots in this guide show every click - follow them in order and you'll be done in minutes.
Once the padlock appears in your browser, your site is secure and serving over HTTPS.
✅ Verify your installation at https://www.atakdomain.com/en/ssl-checker to confirm everything is set up correctly.
Don't have an SSL certificate yet? Browse Atak Domain's SSL options.
View SSL Certificates
Don't have an SSL certificate yet? Browse Atak Domain's SSL options.
Random Articles

4 Easy Ways to Add Google Analytics to WordPress (Using Plugins vs Adding Code Manually)
20.01.2022
Great WordPress slider plugins for large websites
29.11.2021
Most Modern Fontsf for WordPress
06.01.2022
How to Create Outstanding Long-Form Articles in WordPress
30.06.2022
From Local to Global: Leveraging New Domain Extensions to Expand Your Business
13.09.2024